こんにちは。ファンリピートの鳴海です。
今回はBubbleのプラグインにあるSQL Database Connectorの表示、作成、更新、削除までの使い方を実際にアプリを作って解説していきます。
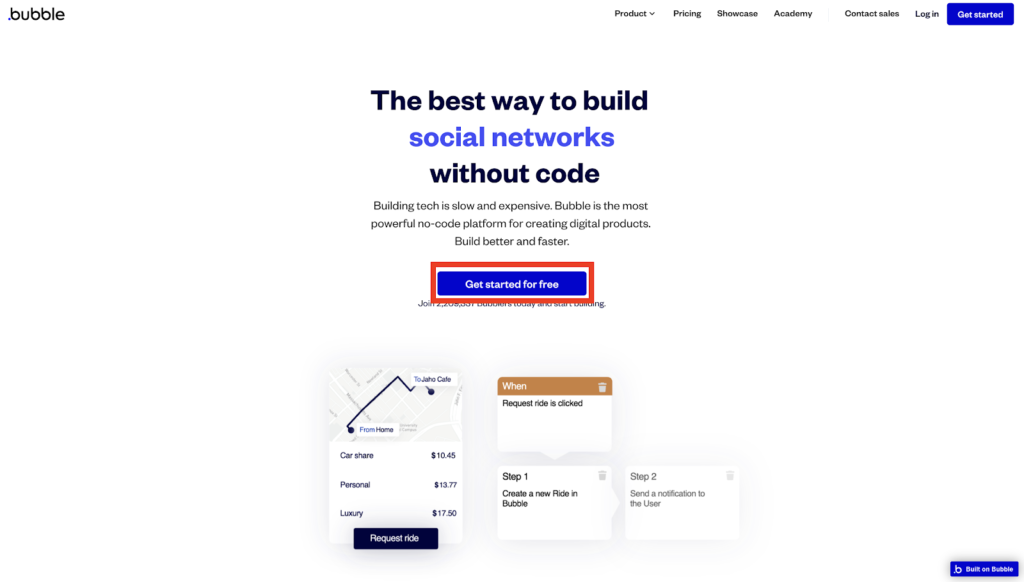
bubbleとは?

URL:https://bubble.io/blog/content/images/2020/09/Logo-with-clearspace.png
コードを書かずにアプリを作れる
一般的なWebサービスやWebアプリの開発では、プログラミングコードを書くといったイメージがありますが、ノーコードツールBubbleでは名前の通り、ノーコードで開発できるサービスとなっています。
また、クラウドプラットフォームというサイト上でアプリケーションを構築できるので、インターネットがあればいつでもどこでもアクセスができるため、チームで連携してアプリを作れます。
bubbleについての詳細は「ノーコードツール「Bubble」って?特徴・料金・使い方を解説」という記事でも解説しておりますので、気になる方は一度ご覧になってみてください。
Bubbleのプラグインとは?
Bubbleの標準機能だけでも、ドロップダウンやチェックボックス、ホバー時のアニメーションなどを実装ができますが、プラグインを追加することによって、APIの呼び出しによるログイン認証の実装やデザインを簡易的に追加できます。
Bubbleの拡張機能
過去にBubbleのプラグインを使って、API経由でのフィルターやバーコードのスキャン、IPアドレス制限の実装方法を初心者でも分かりやすく説明をしているので、ぜひ下記をご覧ください。
記事参考リンク:


SQL Database Connectorとは?
データベースへ接続し、Bubble内でSQLクエリを実行することによって、データへの表示、作成、更新、削除などが可能になります。
本記事では、MySQLを使ってでの実装となりますが、他にもPostGres、Microsoft SQLへの接続もサポートしています。
下記、Bubbleのマニュアルから参照

MySQLとは?
世界でYouTubeやTwitter、facebookなどで最も使われているデータベースがMySQLとなります。
他にも、「Oracle」「PostgreSQL」などが使われておりますが、どちらもオープンソースとなっており、無料で使用できます。
環境構築の方法は?
基本的にMySQLを使うためには、公式サイトでファイルをインストールし、コマンドプロンプトで扱えるように設定するのが定番となっています。
ただ、設定する際にユーザー権限の設定やOSごとで準備が異なることやローカルPCでしか使えないということがあります。
ですが本記事では、自分のPC上ではなくクラウド上やアカウント作成するだけでユーザー情報の設定ができてしまう下記のサイトで環境構築を行います。
BubbleでMySQLを接続するメリット
そもそもBubbleというノーコードでアプリ開発できることがメリットなのですが、元々プログラミングで構成していたサイトをノーコードに移行する際や、ターミナルでわざわざデータに変更を加えたりするのが面倒の時に、Bubbleで手軽にできるのがメリットになるかなと思います。
SQL Database Connectorでアプリを作ってみよう
それでは初めにBubbleでアカウント登録を行います。
Bubble側で準備しよう。
Bubble側でアプリを登録する。
こちらのページにアクセスして、Get started for freeからアカウントを作成しましょう。
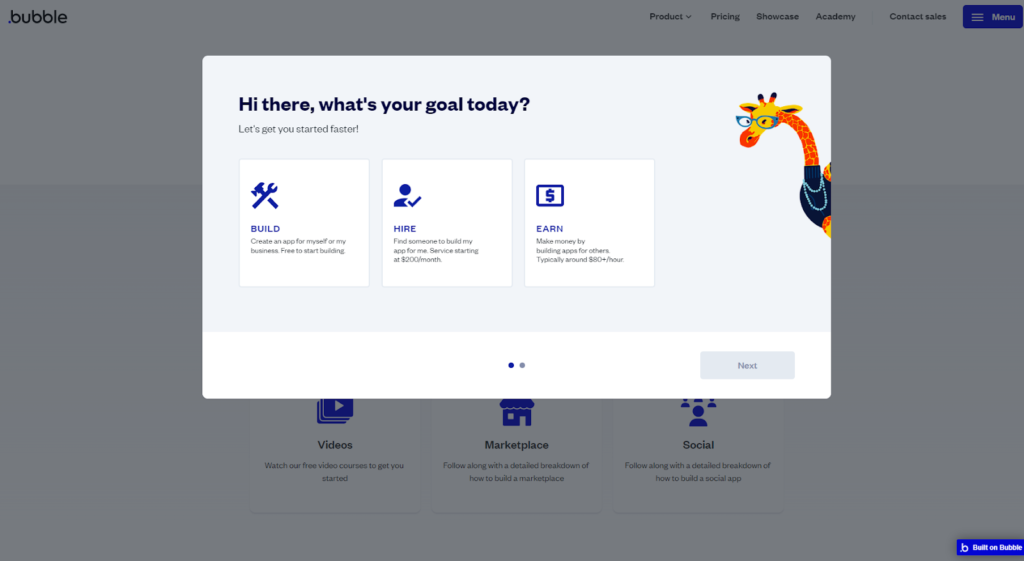
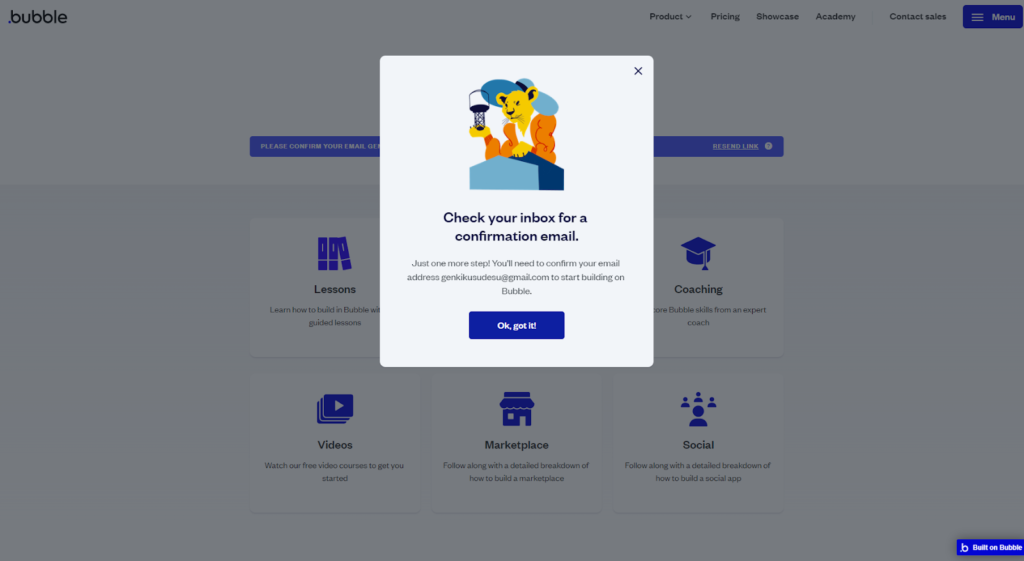
メールアドレスやパスワードを打ち込み、Start buidlingをクリックすると画像のようなポップアップが表示されるので、Build→Nextボタン→other→Completeと進めてください。
そうすると登録したメールアドレスにメールが届くので、そちらをクリックしてあげてください。
リンクをクリックすると、Start buildingのボタンがあるので、クリックしてください。

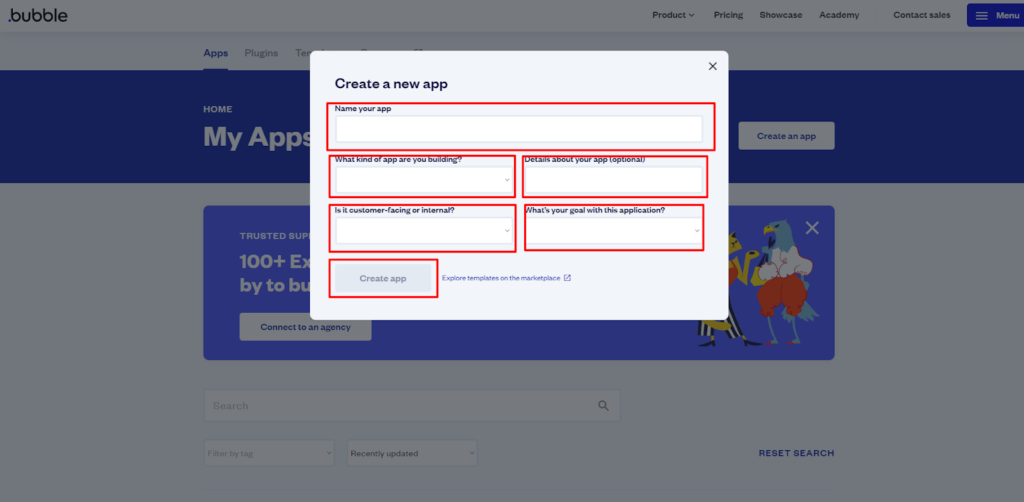
トップページのCreate a new appをクリックし、Name your appで名前を決めて、他の項目を入力し、Create appをクリックすると編集画面に飛びます。
アシスタントというのが左側に表示されるので、Skip application assistantをクリックしてください。
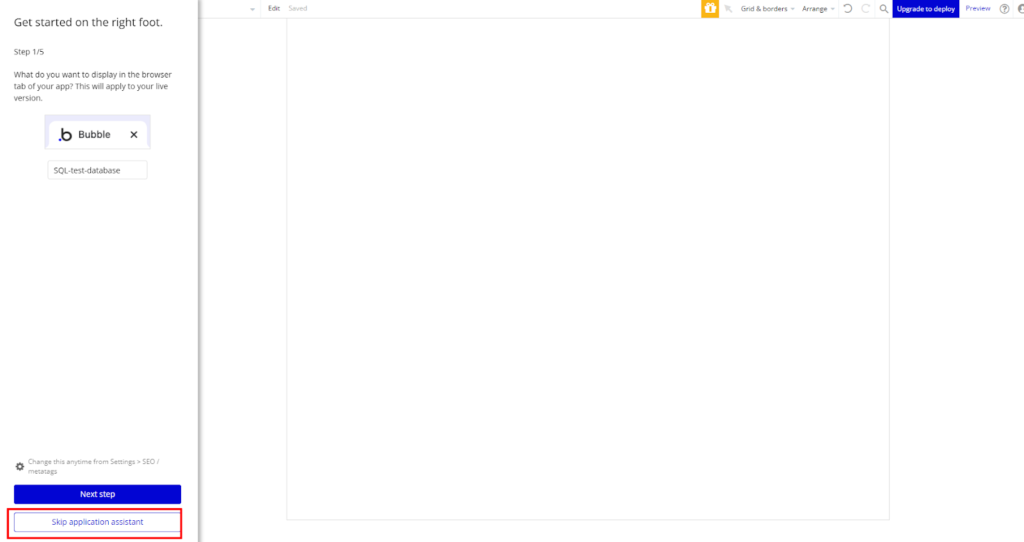
これでアプリの登録が完了です。
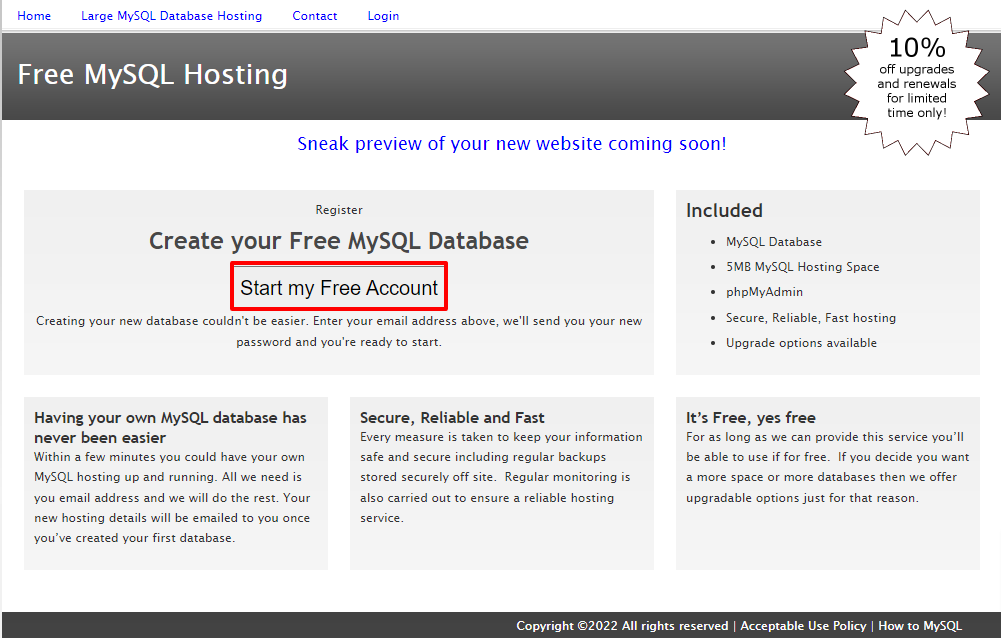
Free MySQL Hostingでデータベースを作成しよう。
アカウントを作成しよう。
Start my Free Accountをクリックします。
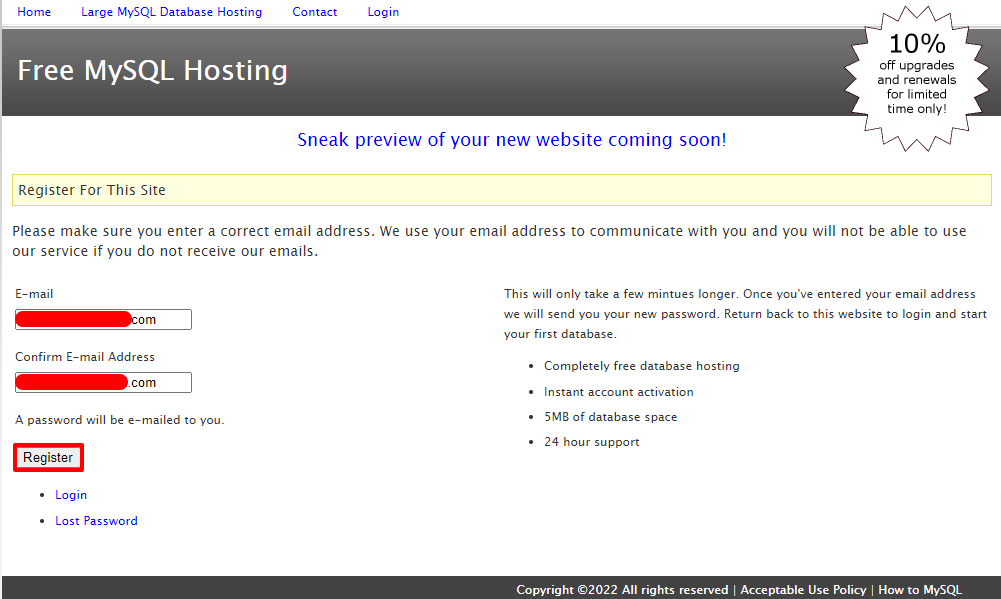
下記の画面で、E-mailとCofirm E-mail Addressを入力し、Registerを押します。
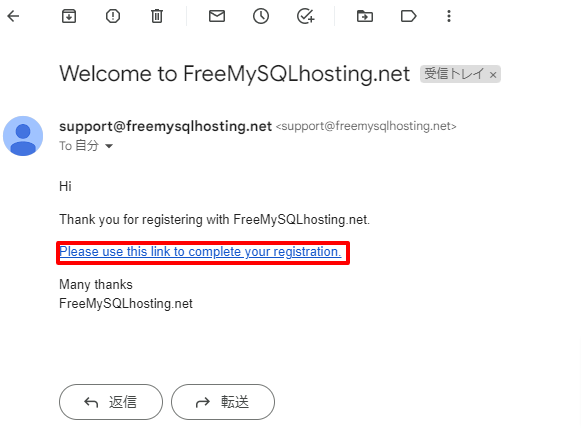
そうするとメールに確認メールが届くので、そちらをクリックします。
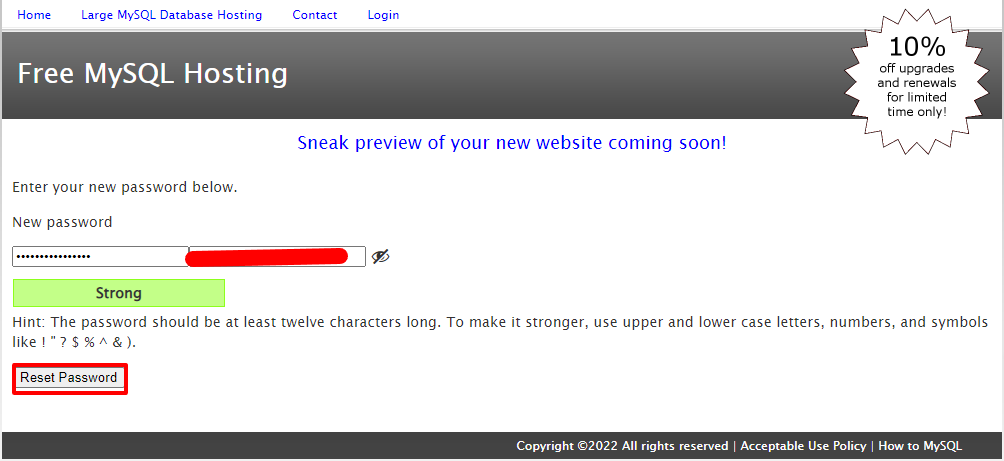
New passwordに任意のパスワードを入力して、Reset Passwordを押します。
メールアドレスとパスワードを入力して、Log Inを押します。

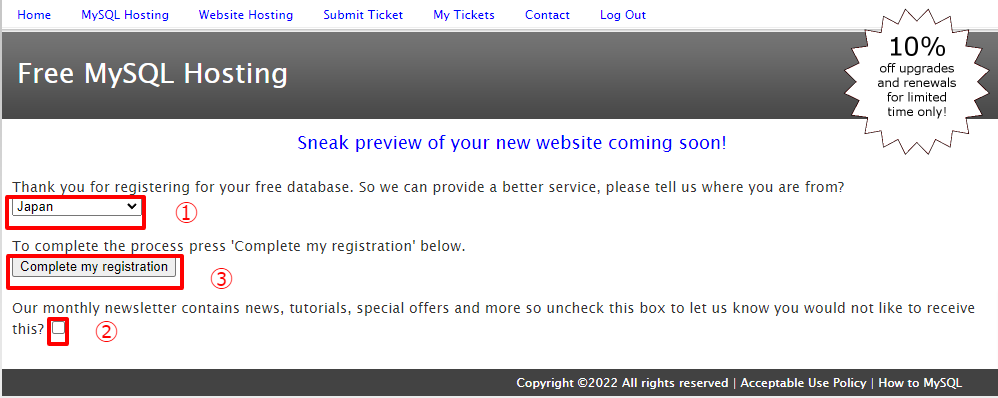
①Japanを選択します。
②チェックを外します。
③Complete my registrationを押します。
①Asia Pacificを選択して、Save Locationを押します。
②Start new databaseを押します。
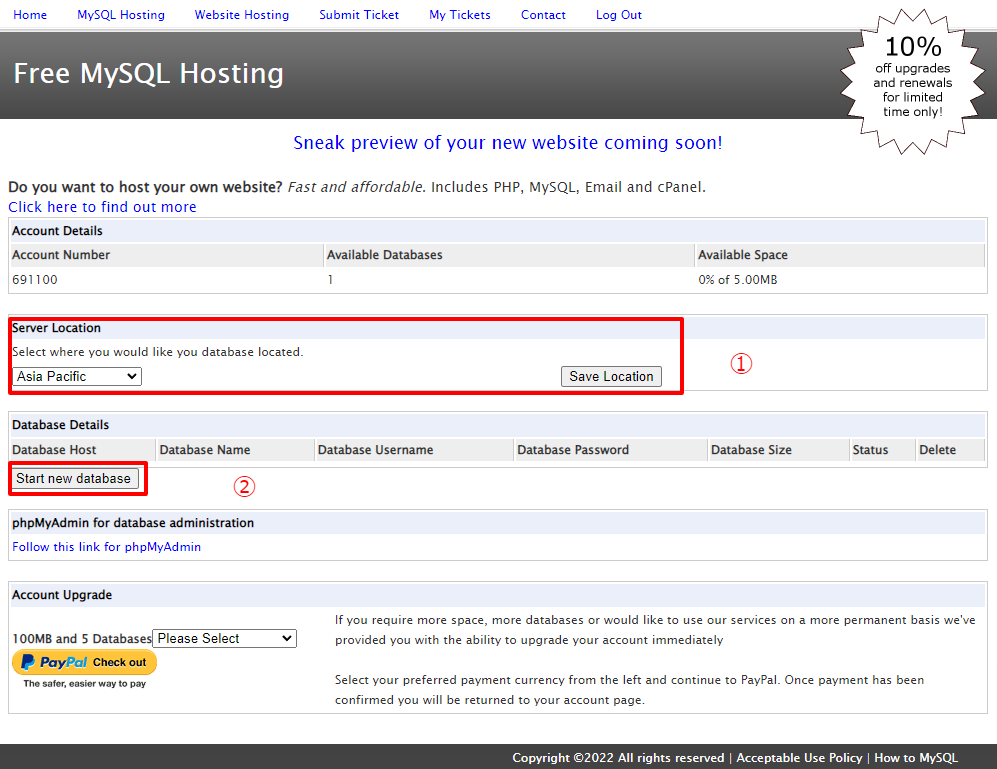
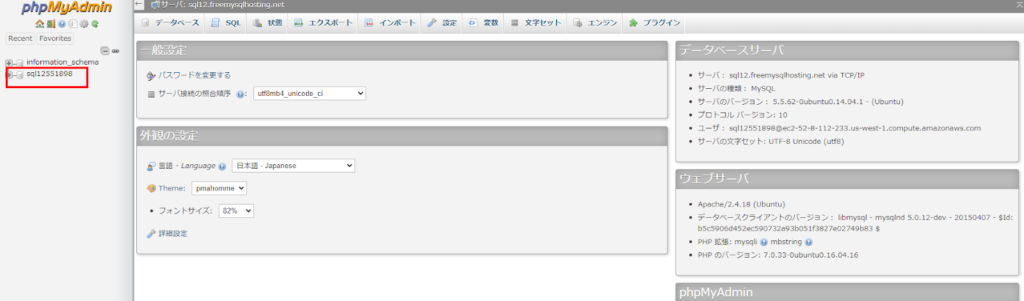
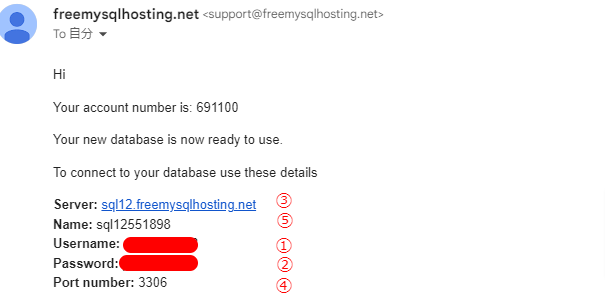
そうするとデータベースが作成されて、しばらくするとphpmyadminへログインするためのログイン情報がメールで送られてきます。

Free MySQL Hostingの画面に戻り、Follow this link for phpMyAdminをクリックします。
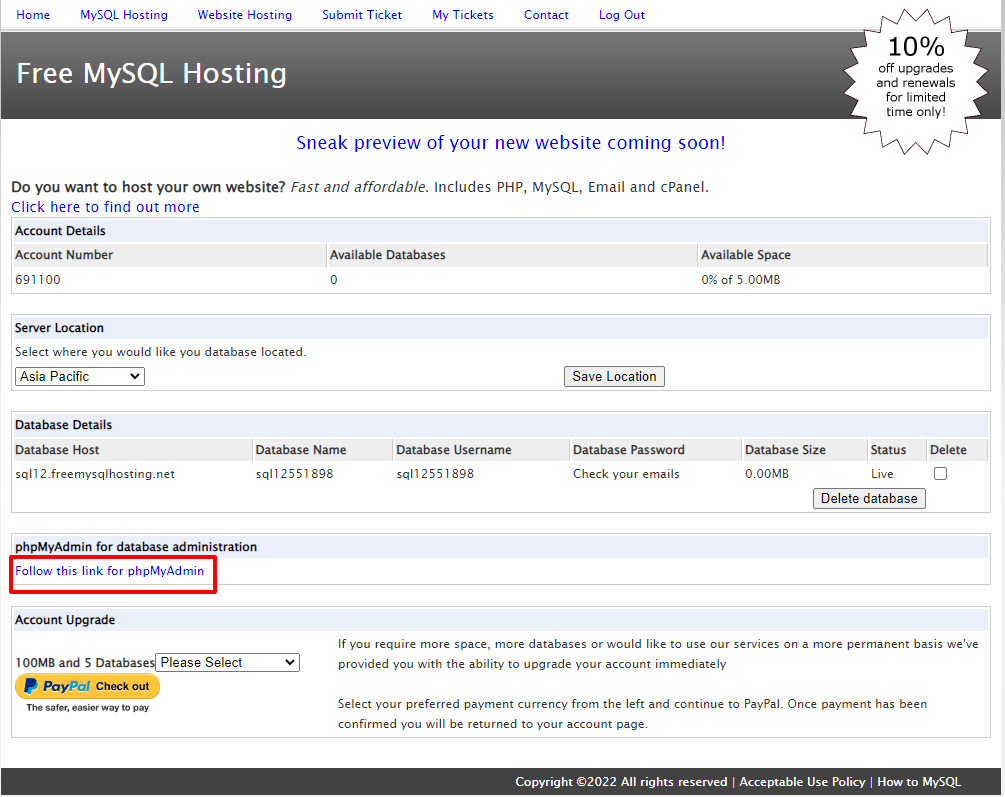
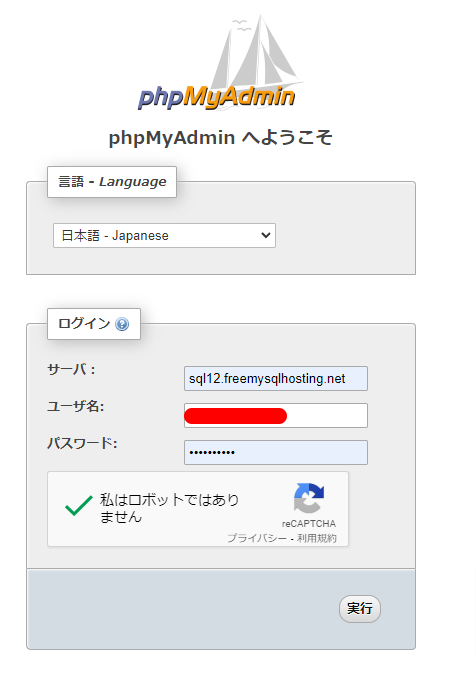
送られたメールにサーバ、ユーザー名、パスワードがあるので、そちらを入力し、実行ボタンを押します。
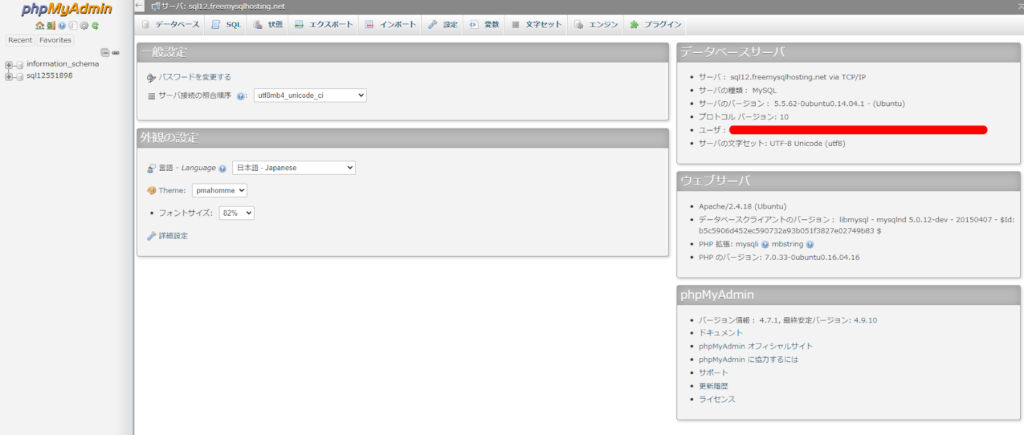
下記のような画面になれば、登録完了です。
phpMyAdminでデータを追加しよう。
左のデータ名をクリックします。
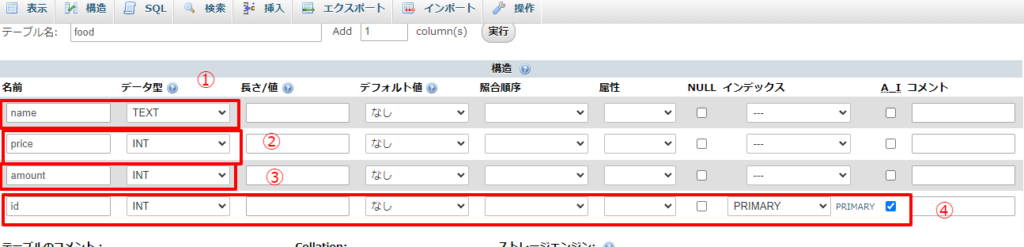
①テーブル名を決めます。
私は食べ物のデータベースを作りたいので、foodにしました。
②カラム数を4にします。
③実行ボタンを押します。

①名前をname、データ型をTEXTにします。
②名前をpriceにします。
③名前をamountにします。
④名前をidにして、インデックスをPRIMARYにし、A_Iにチェックを入れます。
保存するを押します。
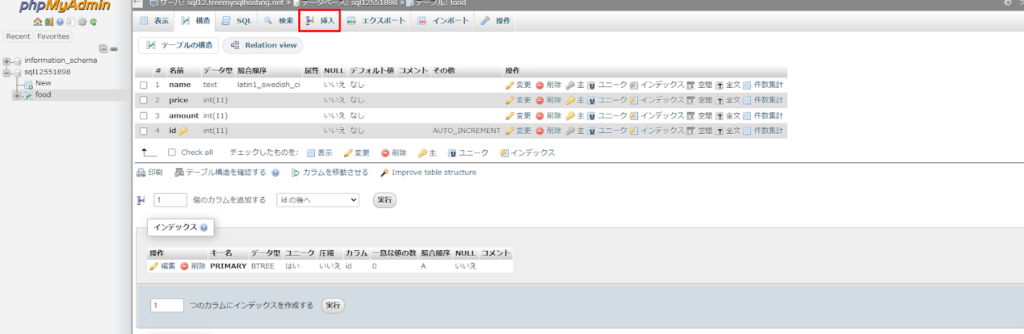
カラムが生成されていることを確認できたら、上の挿入を押します。
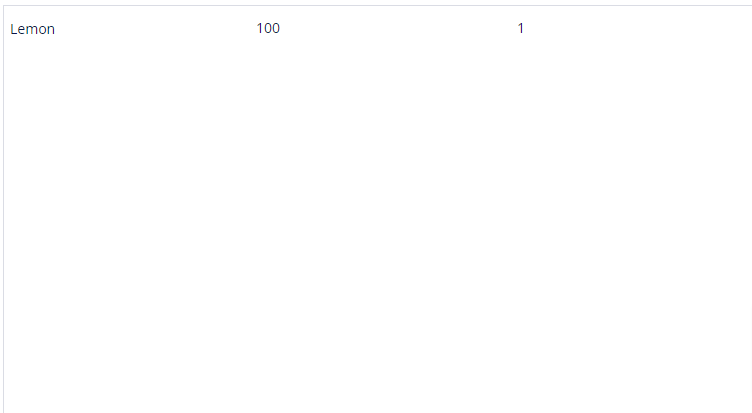
それぞれ値を入力し、実行ボタンを押します。idでは番号が自動生成されるので、入力しなくても問題ありません。
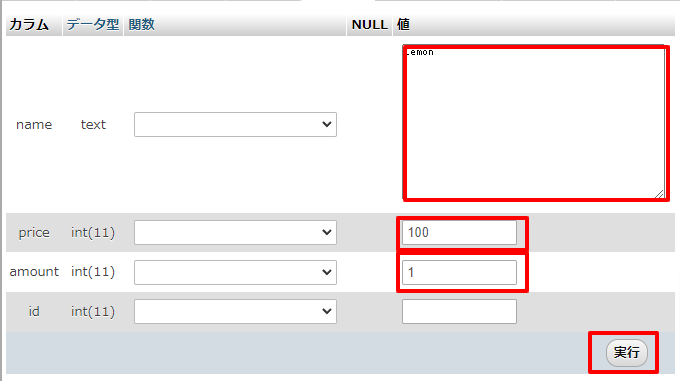
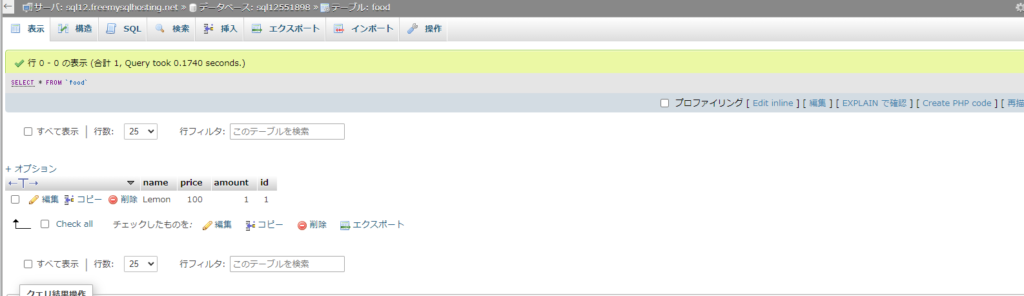
上の表示を押して、データが挿入されていたらOKです。
SQL Database ConnectorとphpMyadminを接続しよう。
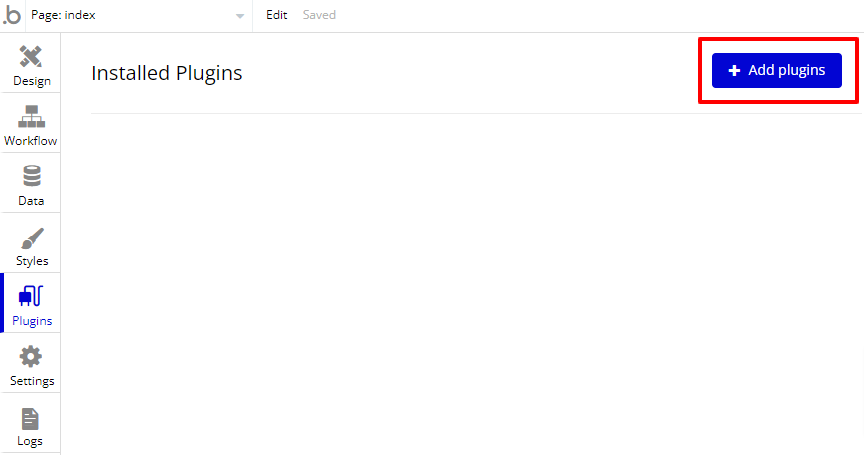
プラグインを追加しよう。
左タブのPluginをクリックしてください。

Add pluginsを押してください。
左でSQL Database connectorと検索し、該当してでてきたものをInstallします。
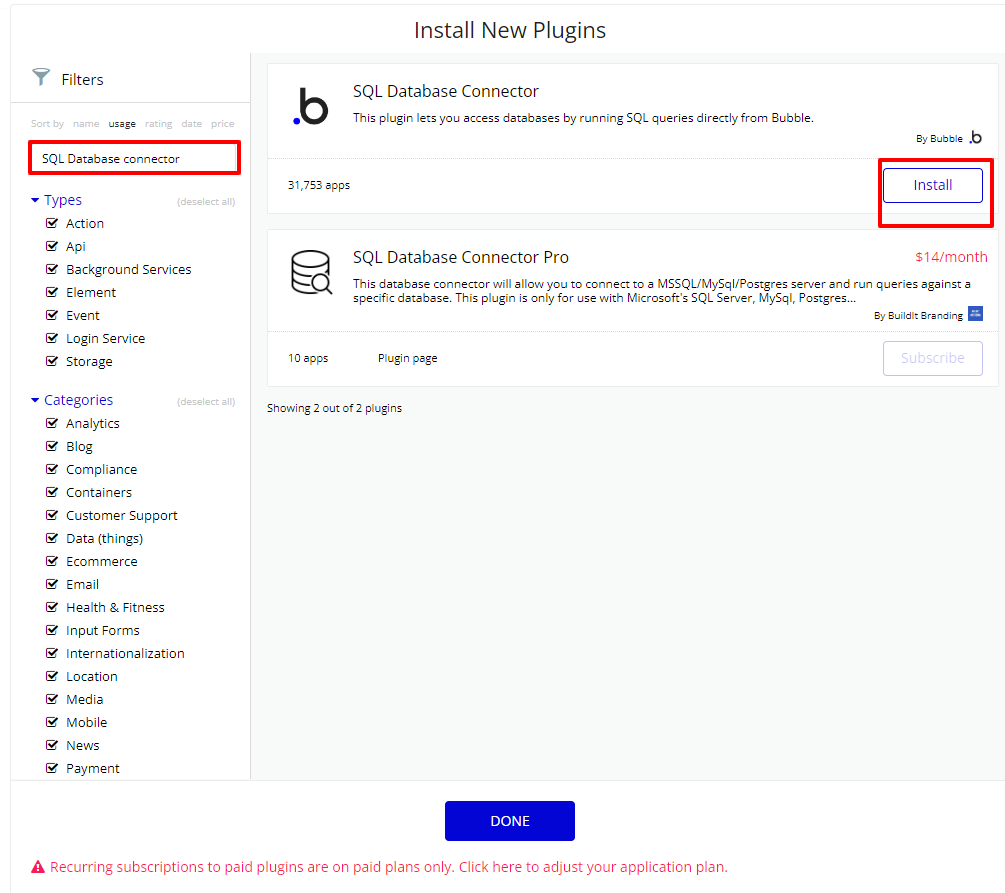
これでプラグインのインストールは完了です。
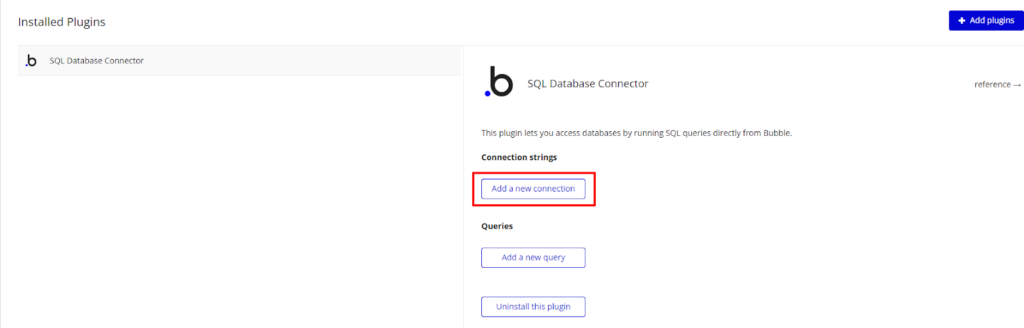
接続しよう。
Add a new connectionを押します。
①Connection nameを任意の名前にします。
②Database typeをMySQLにします。
③mysql://と入力します。
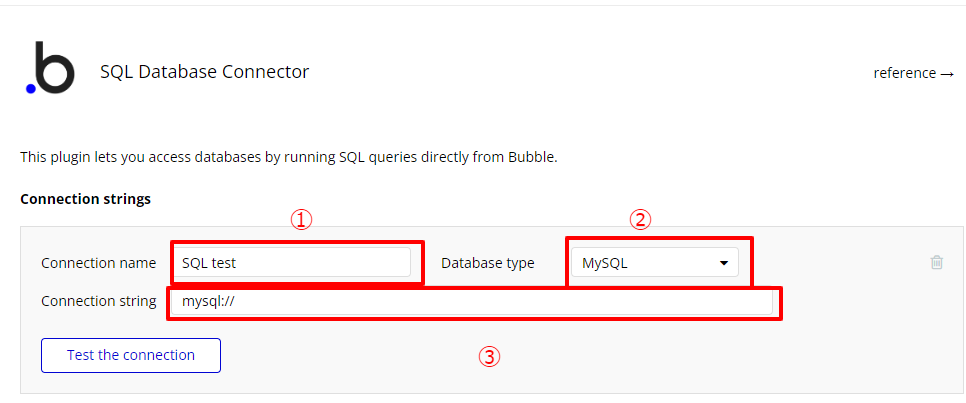
mysql://の続きでは、①:②@③:④/⑥となるように入力します。
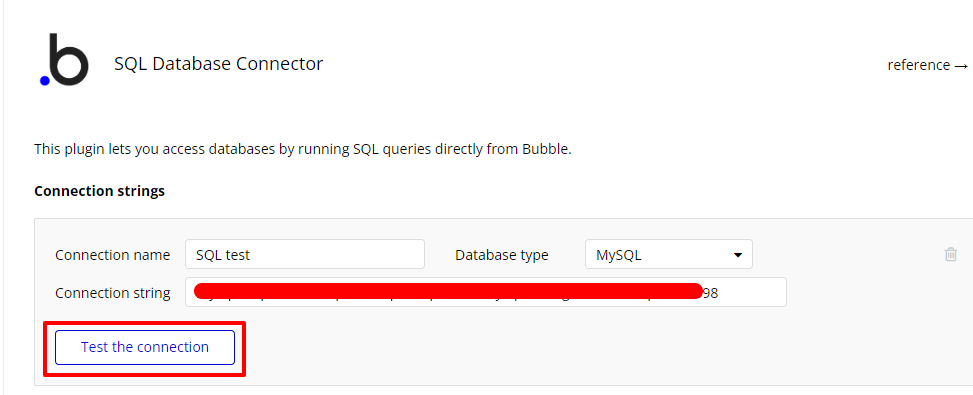
Test the connectionを押して、Database connectedになれば接続完了です。
データを表示できるようにしよう。
plugins側で設定しよう。
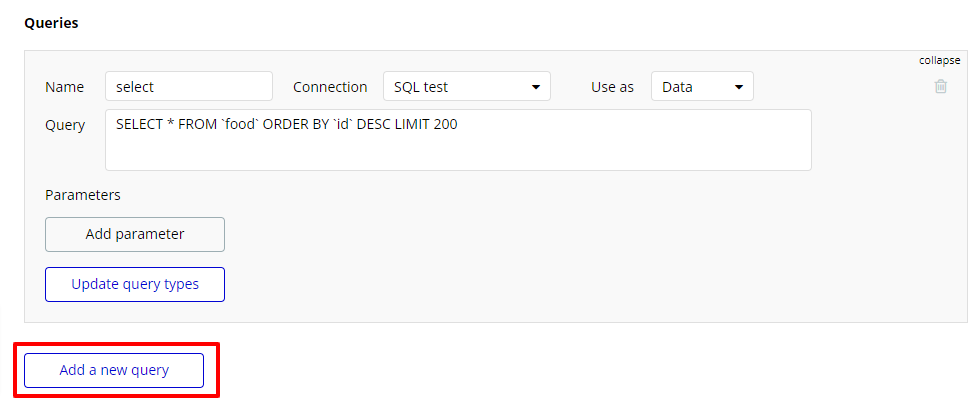
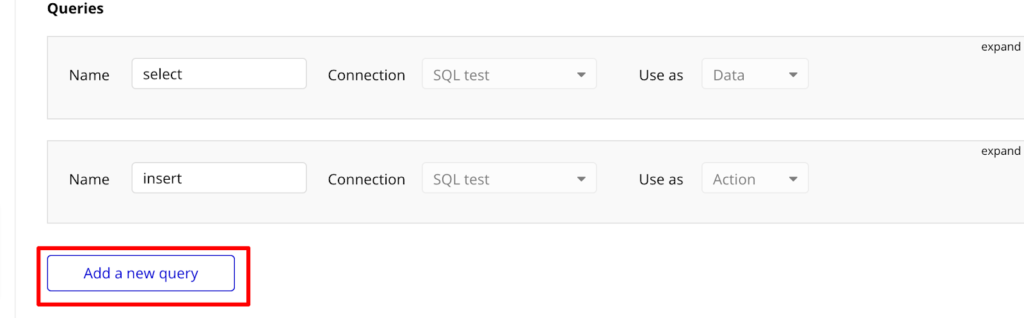
Add a new queryを押します。

①任意の名前にします。
②Use asをDataにします。
③下記の通りにします。
SELECT * FROM `food` ORDER BY `id` DESC LIMIT 200
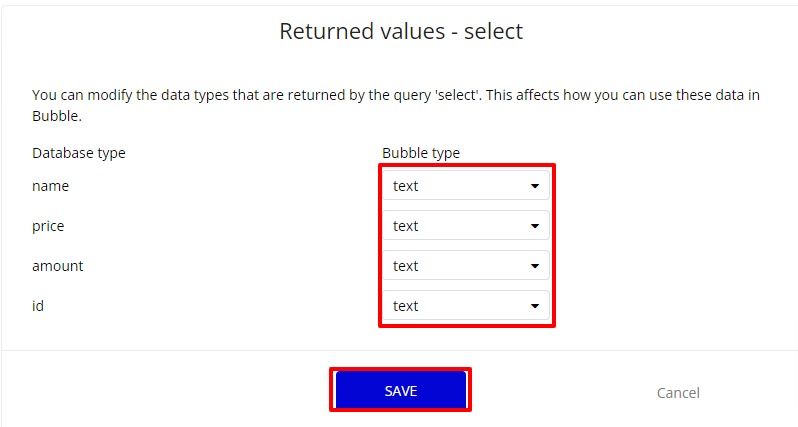
④Initialize this queryを押します。

全てtextにし、SAVEを押します。
これでプラグイン側での設定は完了です。
designを設定しよう。
Designタブを押します。

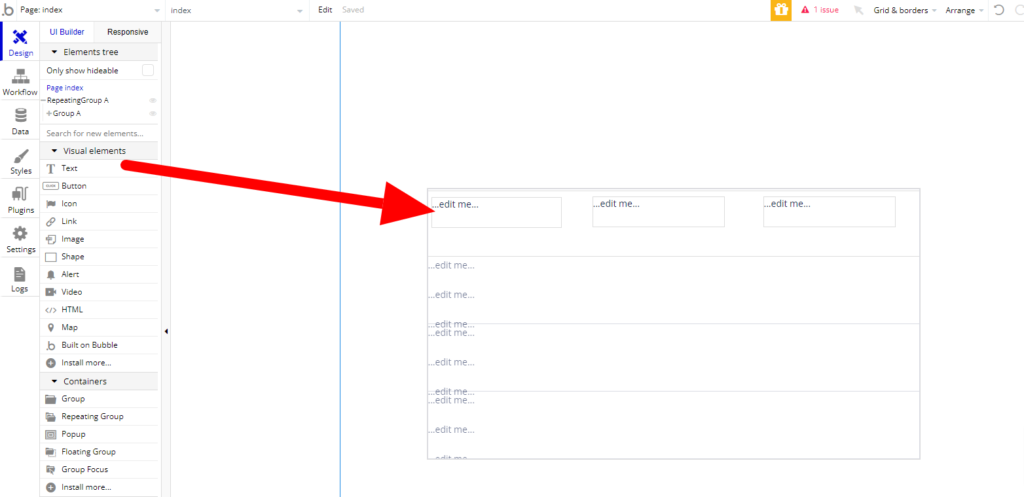
①Repeating Groupを設置します。
②①の列内にGroupを設置します。
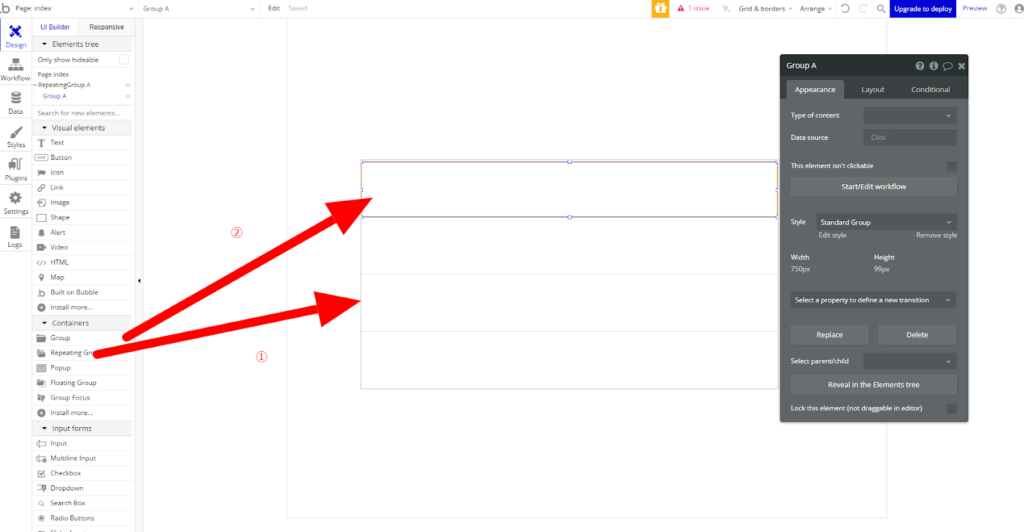
テキストを3つ設置します。
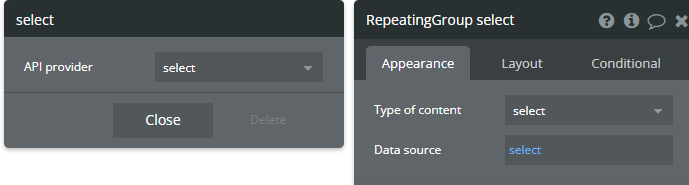
Repeating groupをクリックし、Type of contentをselectにします。
Data sourceでは、Get Data from an external APIを選択し、API providerでselectを選択します。
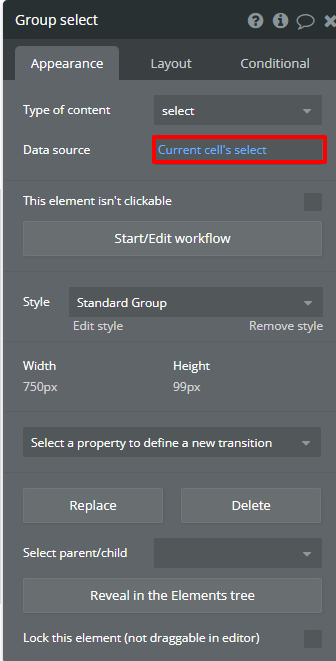
Groupでは、Type of contentをselectにし、Data sourceをCurrent cell’s selectにします。
テキストエレメント内には、Insert DynamicでそれぞれParent group’s select’sでName、Price、Amoutに設定してください。
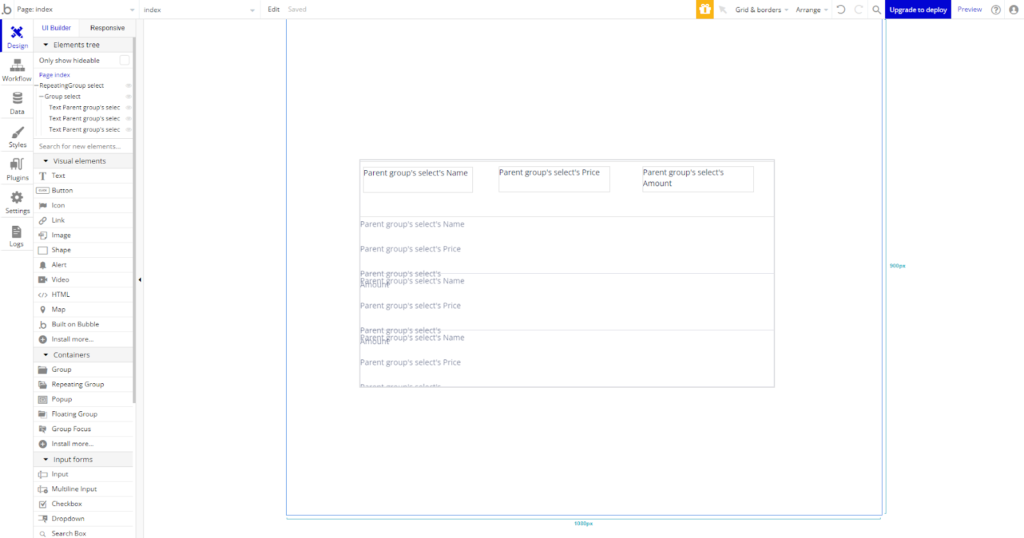
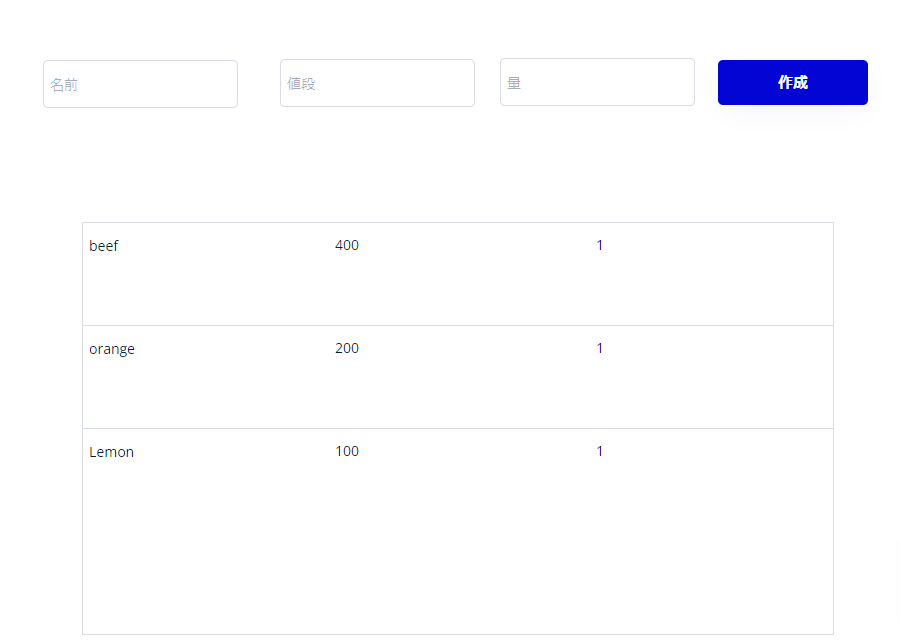
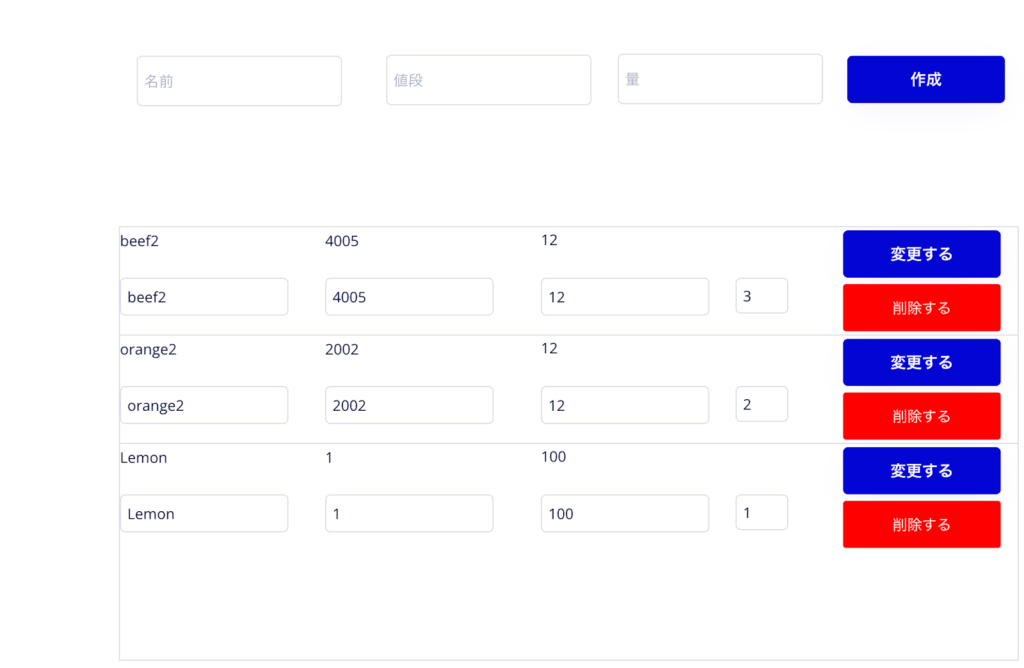
プレビューを押して、データが表示されていればOKです。
データを作成できるようにしよう。
plugins側で設定しよう。
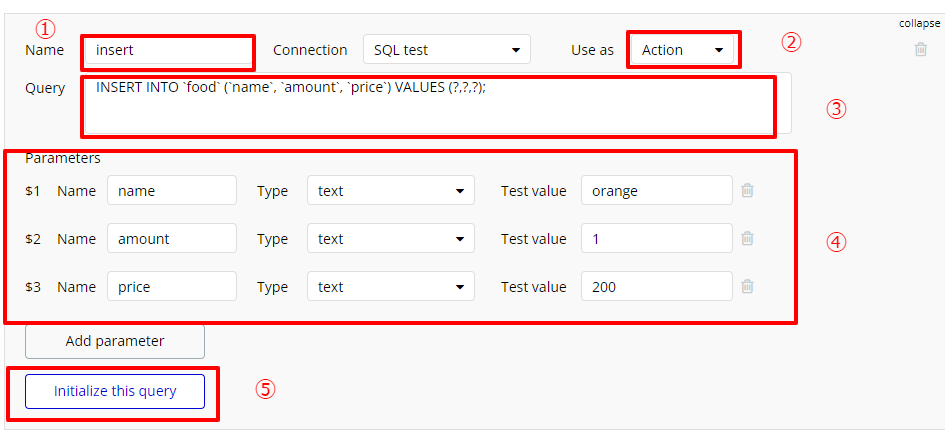
Pluginsの画面に戻り、Add a new queryを押します。
①Nameではinsertにします。
②Use asではActionを選択します。
③Queryでは下記の通りに入力します。
INSERT INTO `food` (`name`, `amount`, `price`) VALUES (?,?,?);
④Parametersでは、Name、amount、priceを追加します。Test Valueではそれぞれ任意の値を入れます。
⑤Initialize this queryを押します。
エラーがでなければ、これで設定は完了です。
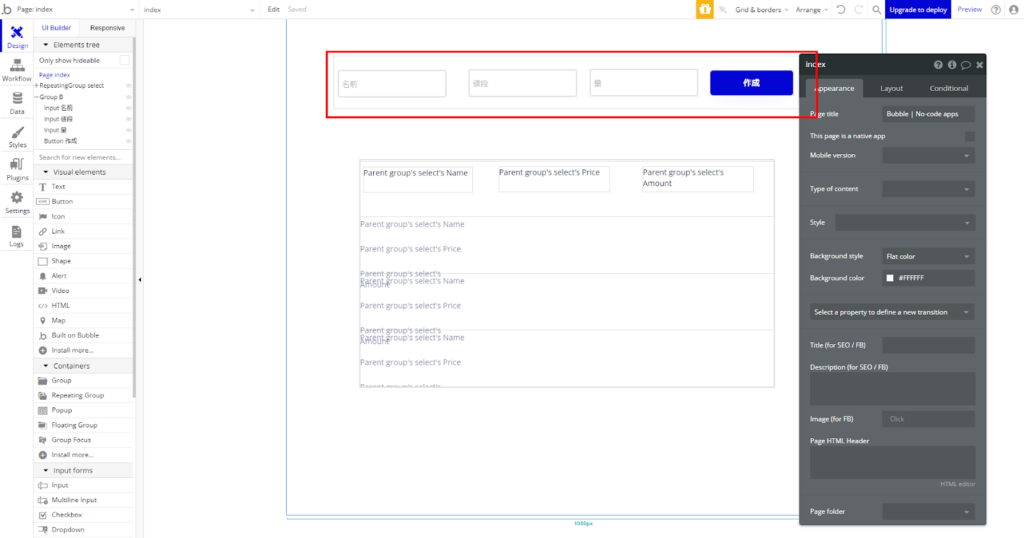
designを設定しよう。
Design画面に戻ります。
①Groupエレメントを設置します。
②①内にInputエレメントを3つ設置します。
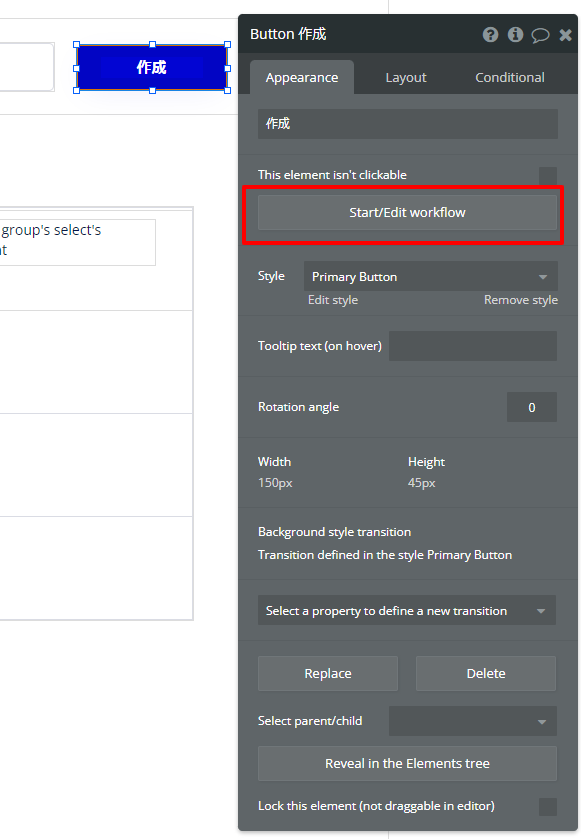
③①内にButtonエレメントを1つ設置します。
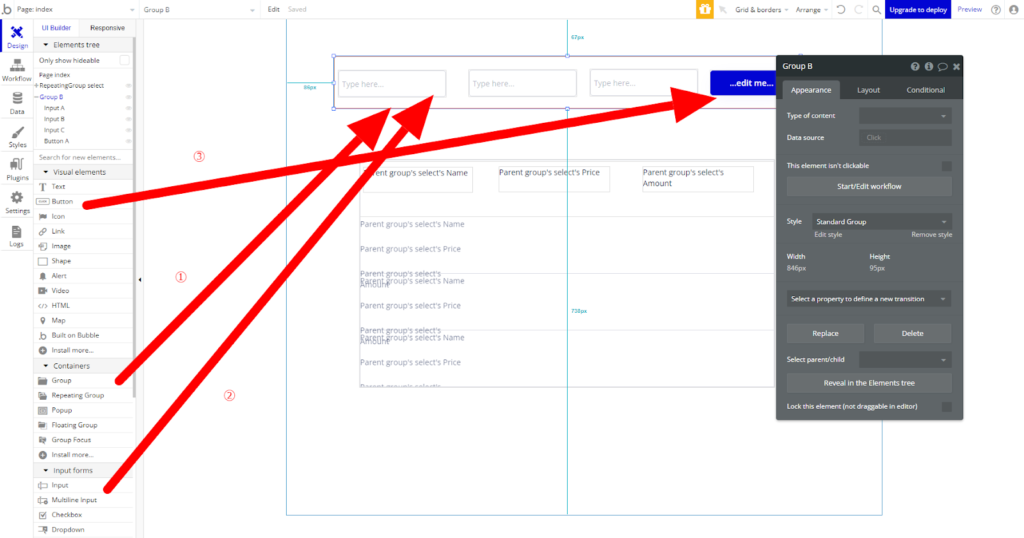
それぞれplaceholderを画像の通りに変更します。
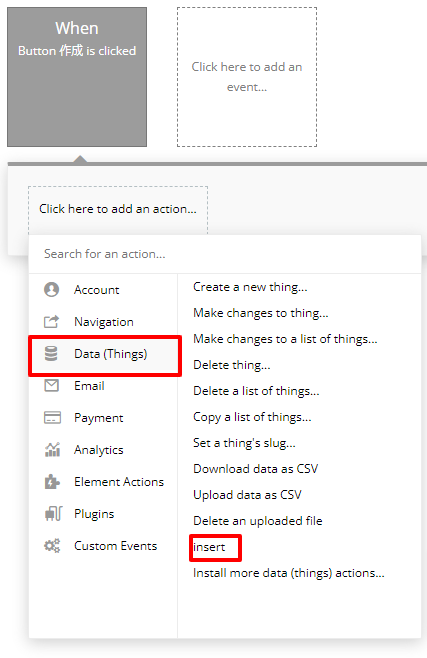
次にButtonのWorkflowを開きます。
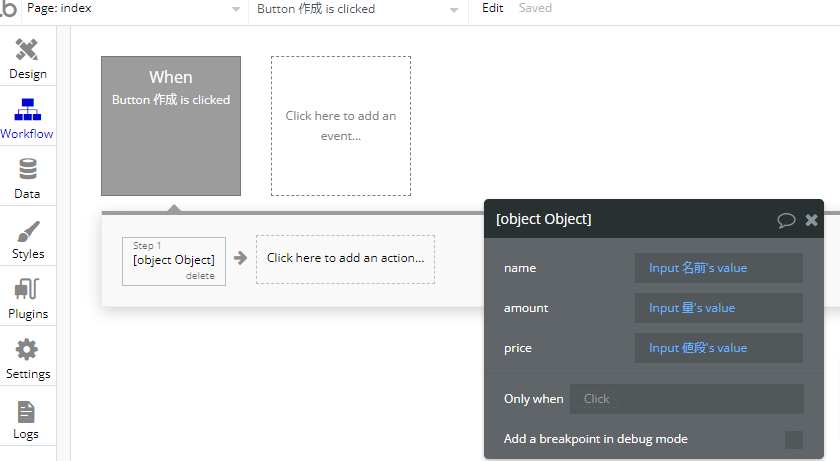
Data(things)からinsertを選択します。
Step1では、画像の通りにinsert dynamicで入力します。
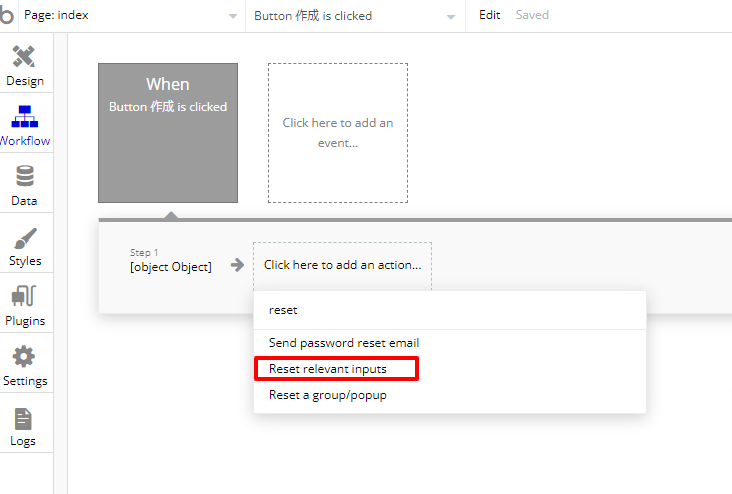
Step2では、Reset relevant inputsを選択します。
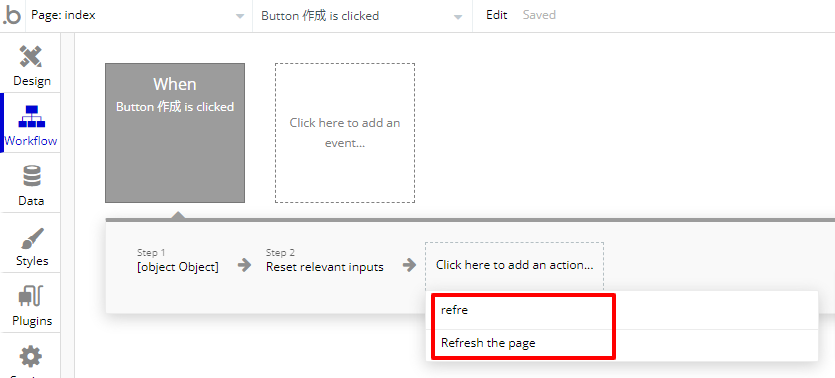
Step3では、データの更新したとしてもbubble側での読み込みが遅い可能性があるので、Refresh the pageを選択します。
プレビューで表示してみて、データを挿入できていればokです。
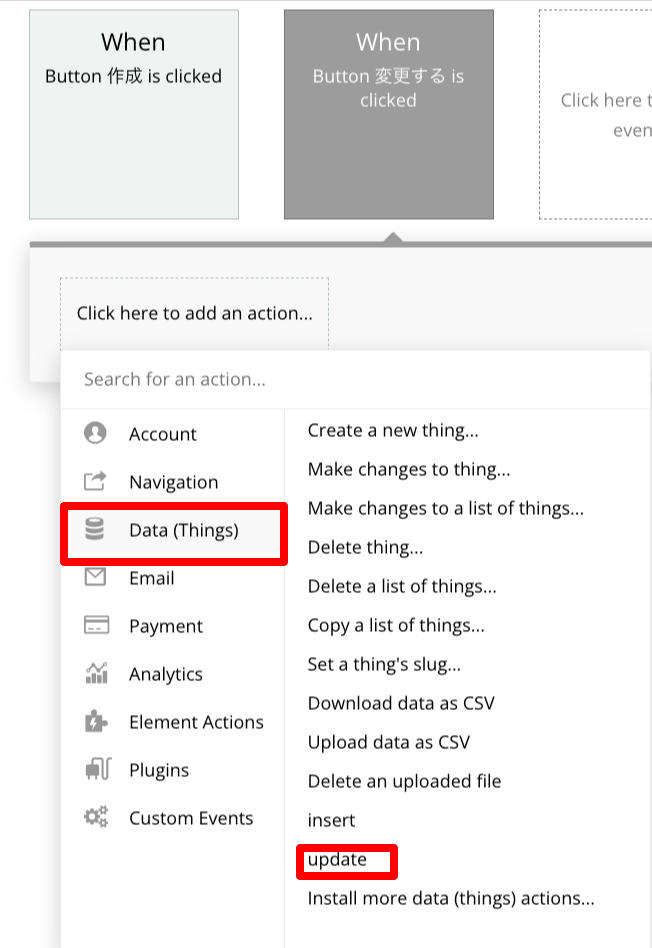
データを編集できるようにしよう。
plugins側で設定しよう。
pluginsの画面に戻ります。
Add a new queryを押します。
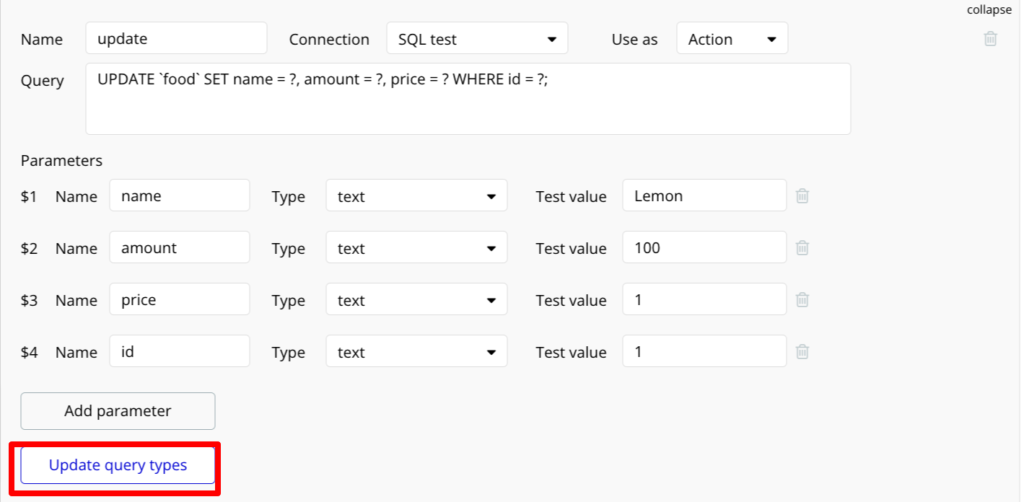
①updateにします。
②Use asをActionにします。
③Queryに下記の通りに入れます。
UPDATE `food` SET name = ?, amount = ?, price = ? WHERE id = ?;
④Parameterにはカラムの通りに入力し、Text valueはphpMyadminで最初に追加データを指定します。
⑤Initialize this queryを押します。
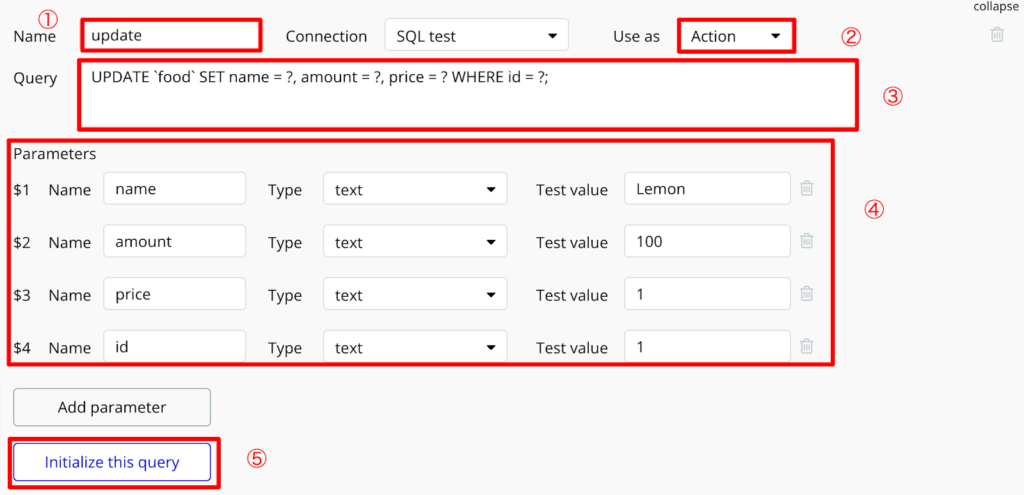
エラーがでなければOKです。
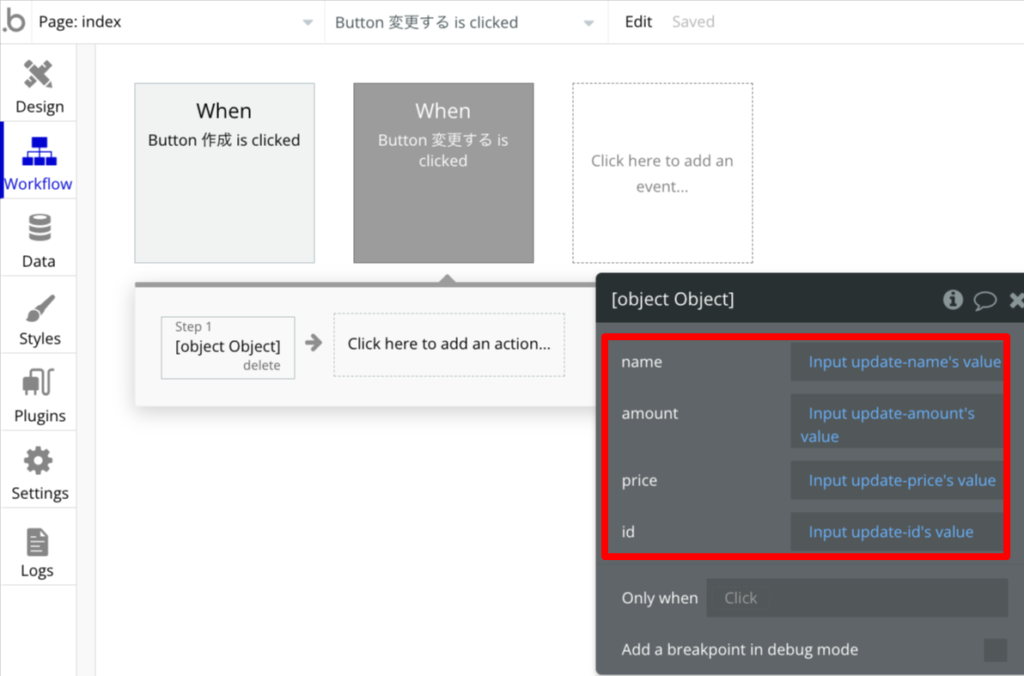
designを設定しよう。
Desingタブに戻ります。
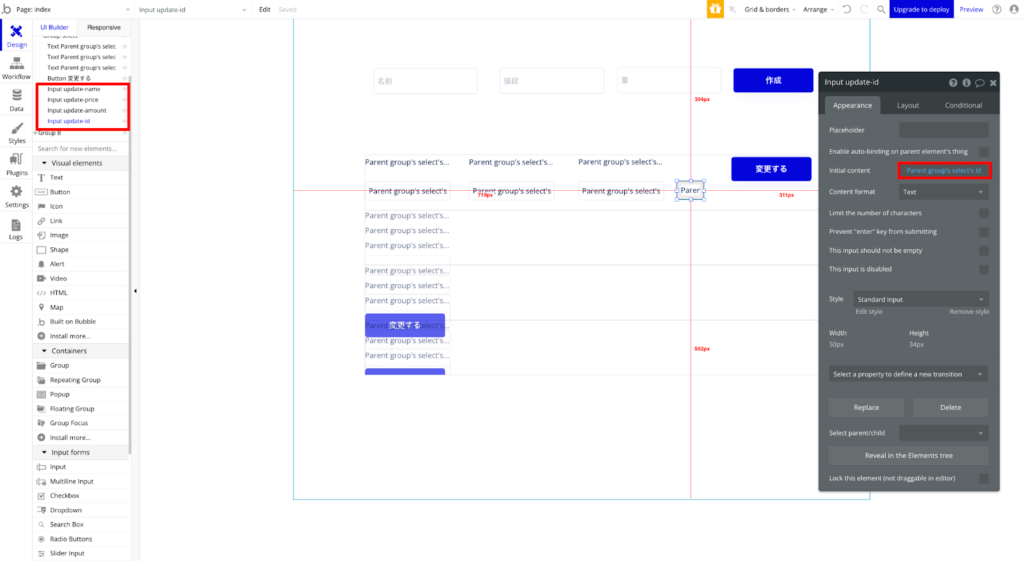
Repeating group内にInputエレメント4つ配置し、Buttonエレメントを1つ配置します。
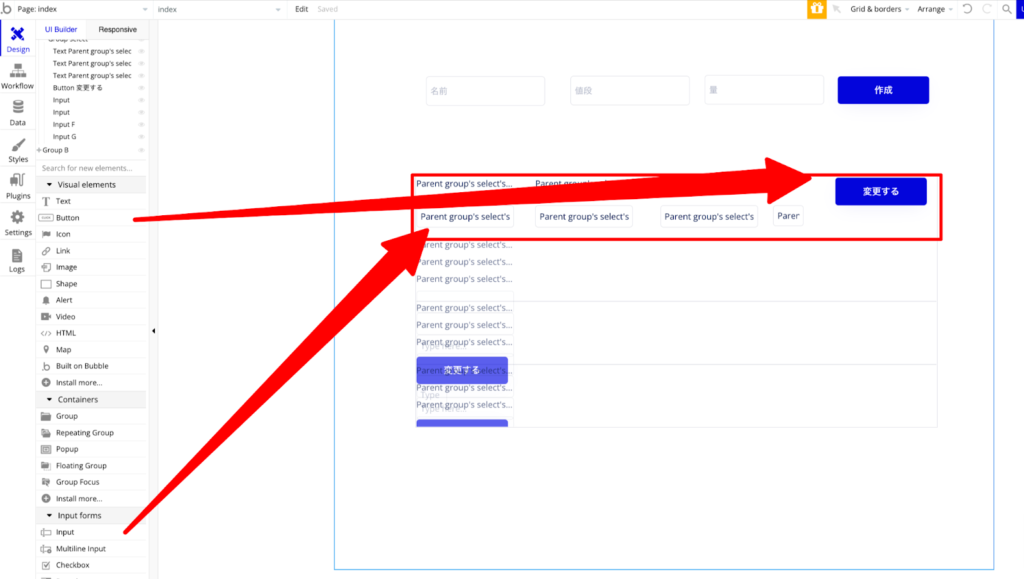
それぞれエレメント名を変更し、initial contentをParent group’s select’s Name、price、amout、idという形にInsert dynamic dataで挿入します。
変更するボタンのWorkflowを開きます。

Data(things)のupdateを選択します。
それぞれ変更したエレメント名通りに挿入します。
Step2ではRefresh the pageを選択します。
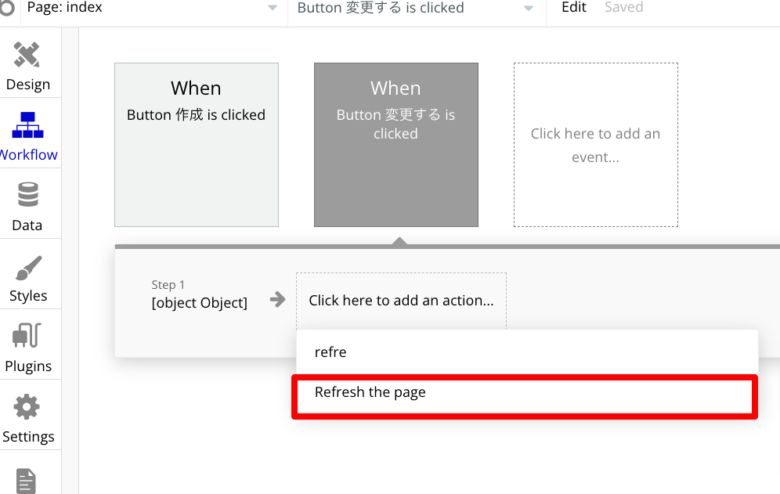
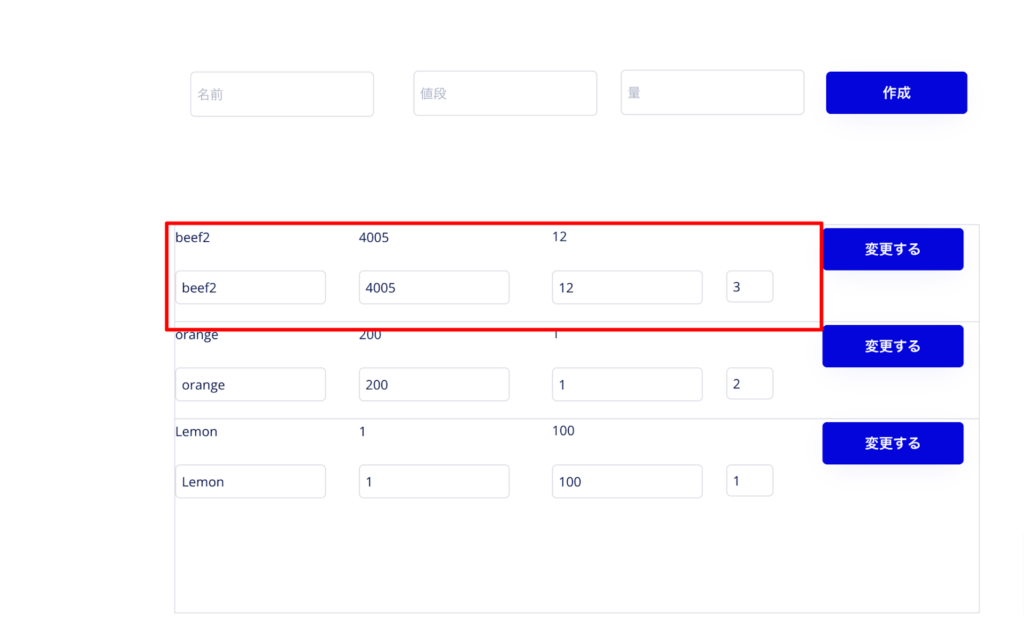
これでプレビューを押して、inputに表示されている値を変更し、変更するボタンを押すと値が変わっていると思います。
尚、idの値を変えてしまうとSQLでWHEREの条件式から外れてしまうので、変更してはいけないので気をつけてください。
データを削除できるようにしよう。
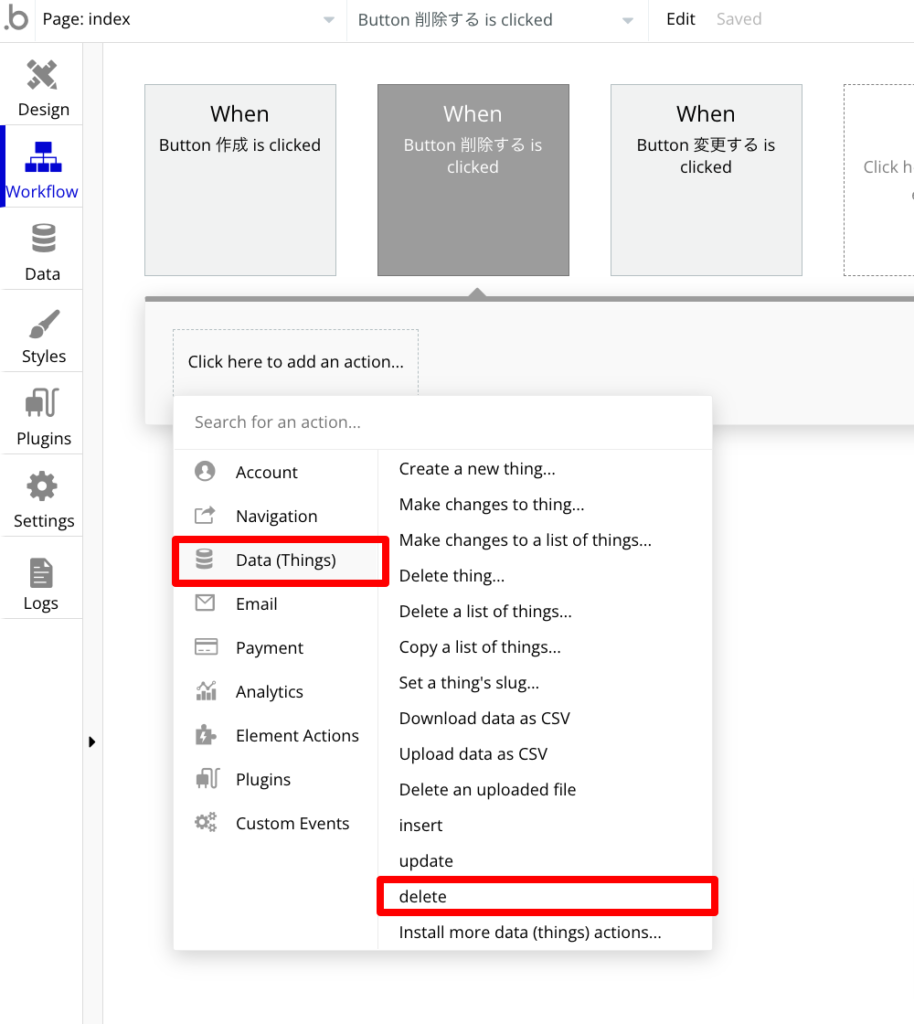
plugins側で設定しよう。
pluginsの設定画面を開きます。
Add a new queryをクリックします。
①nameをdeleteにします。
②Use asをActionにします。
③Queryを下記の通りにします。
DELETE FROM `food` WHERE id = ? ;④Parametersに画像の通りに入力します。Test valueには存在しているidを入力してください。
⑤Initialize this queryをクリックします。
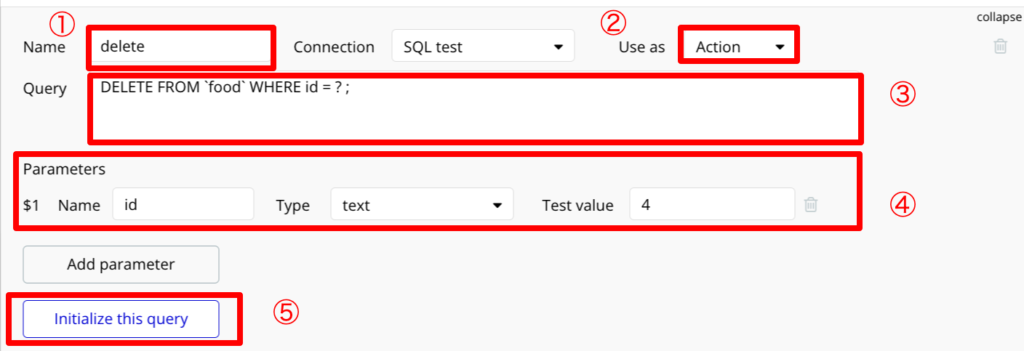
エラーがでなければ、OKです。
designを設定しよう。
Desing画面を開きます。
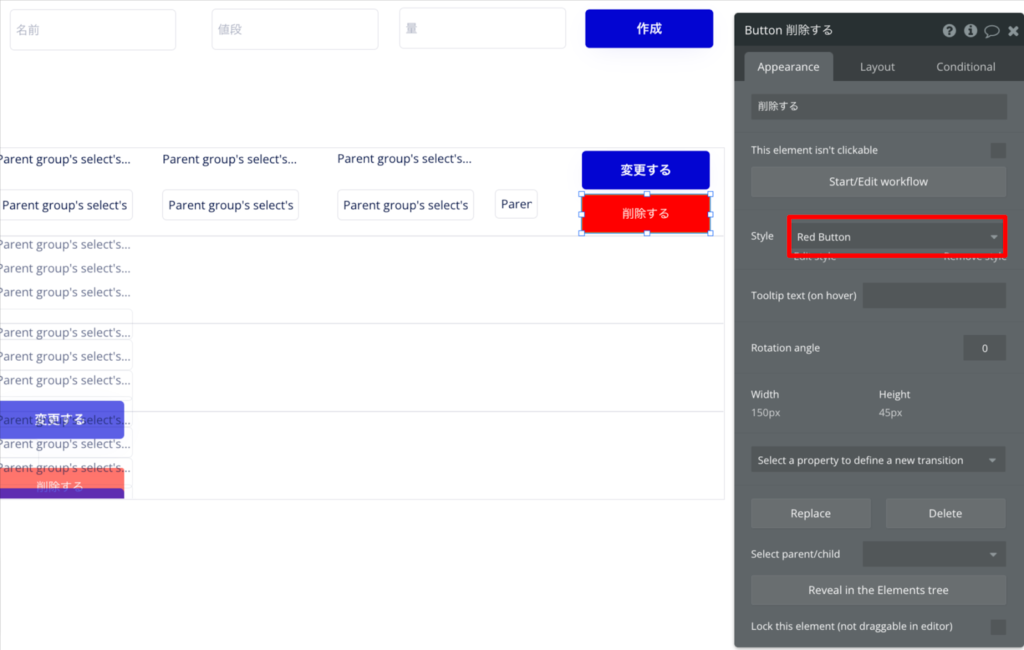
Group内にButtonエレメントを設置し、削除すると入力します。
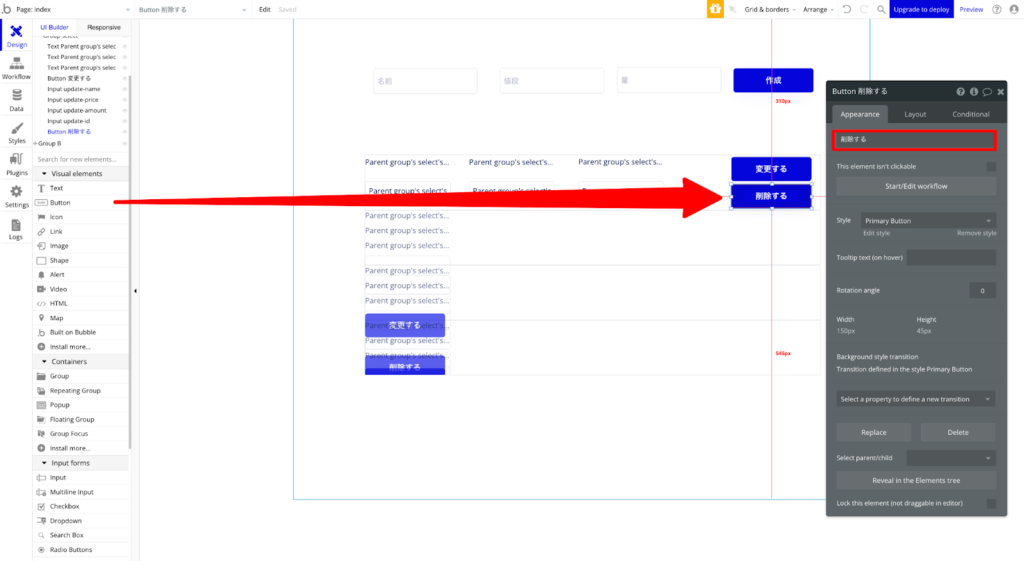
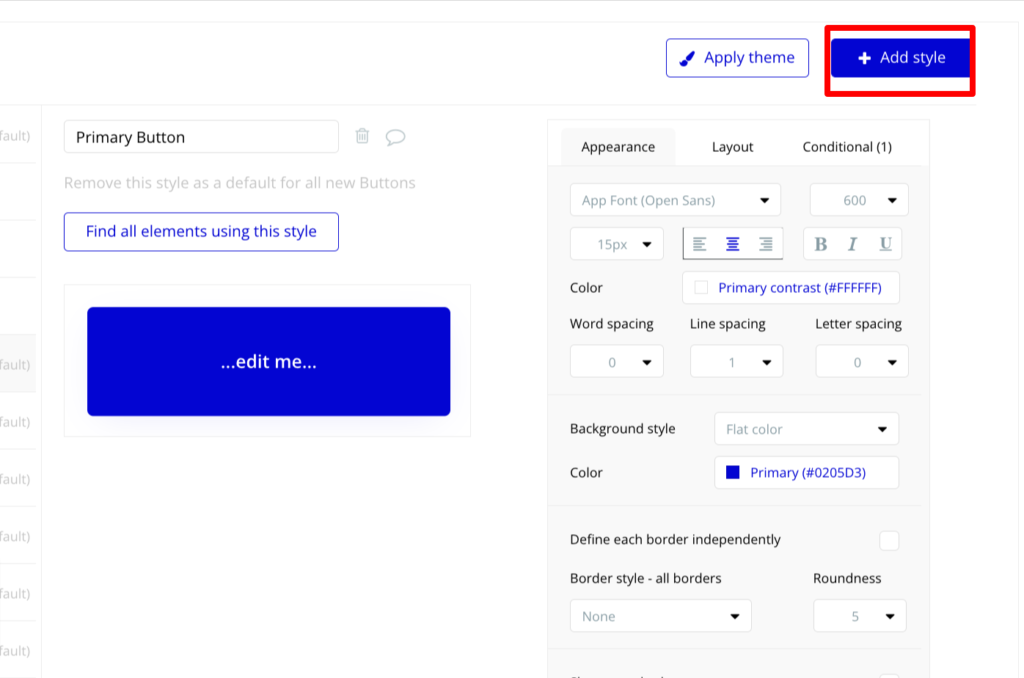
ボタンの色を変更したいので、Edit styleをクリックします。
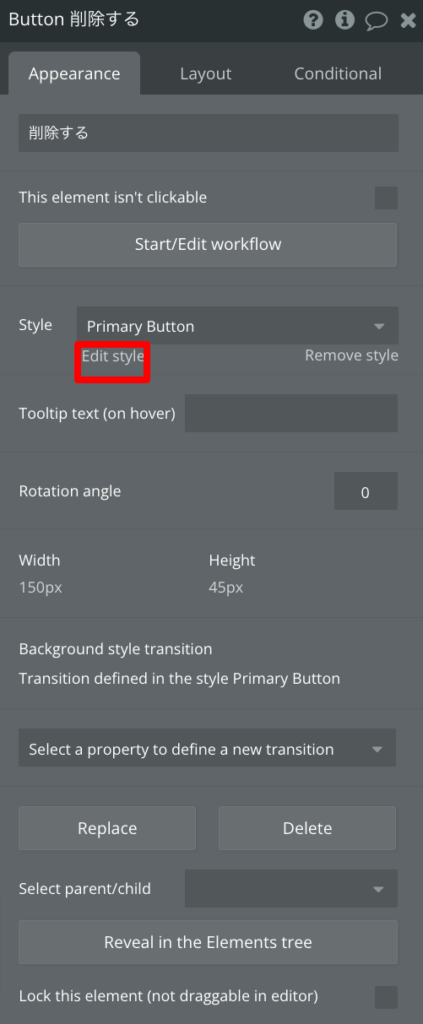
Add styleを押します。
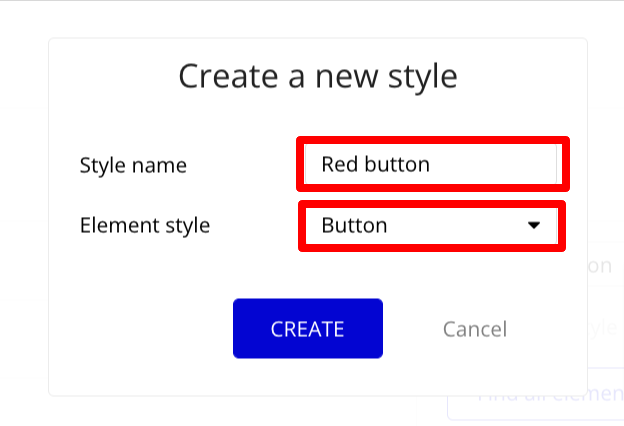
Style nameをRed button、Element styleをButtonにし、CREATEを押します。
colorを変更します。
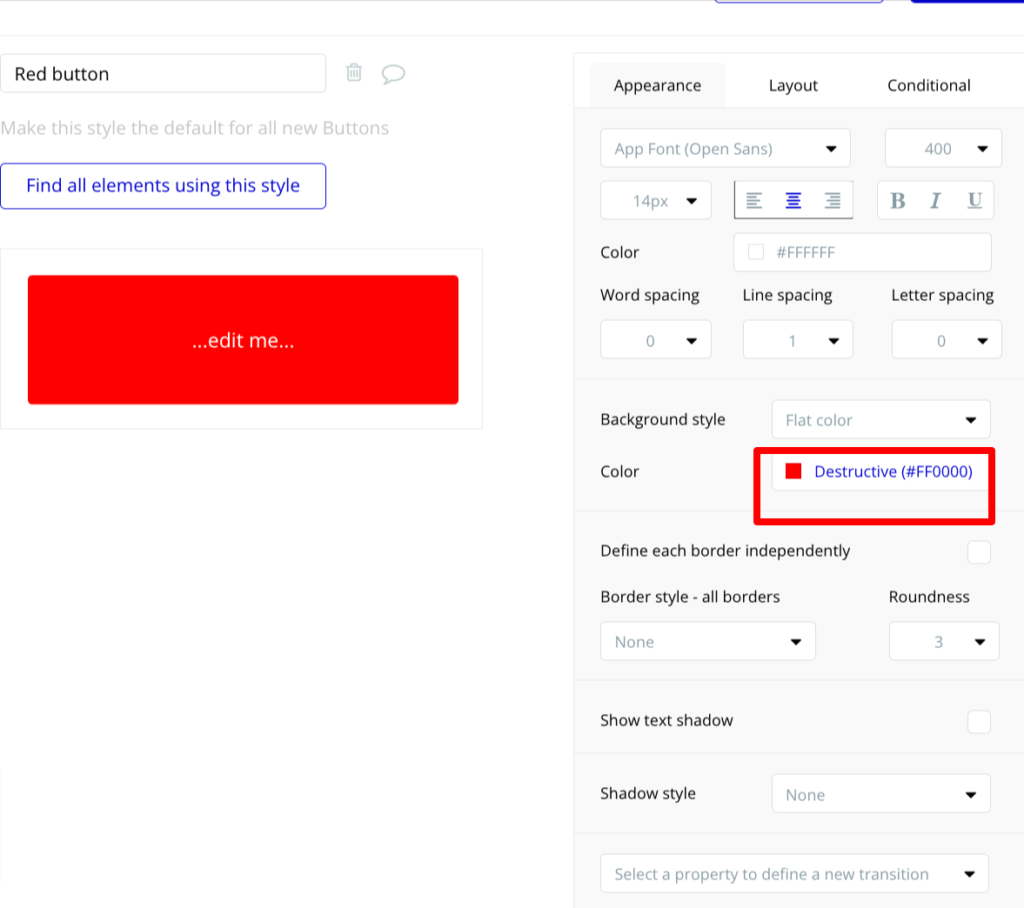
Desing画面に戻り、StyleをRed Buttonに変更します。
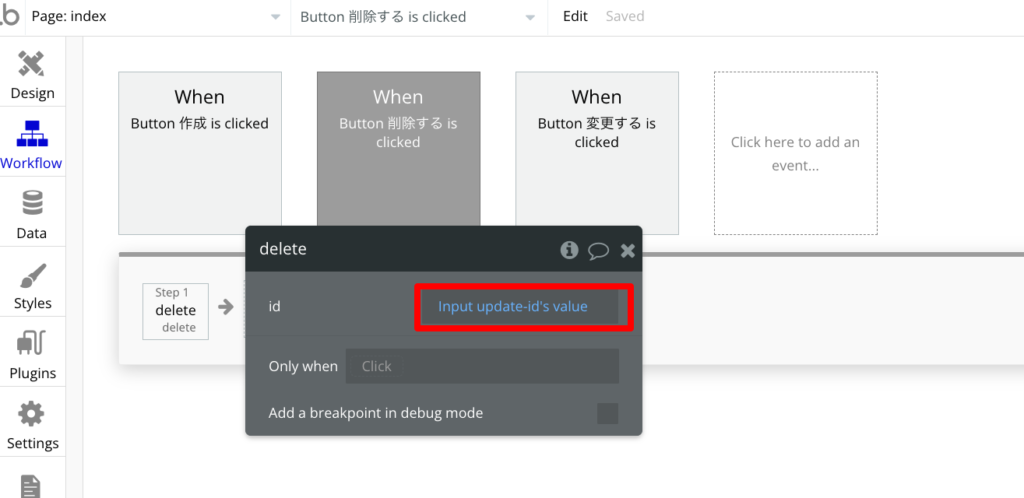
Workflowを開きます。
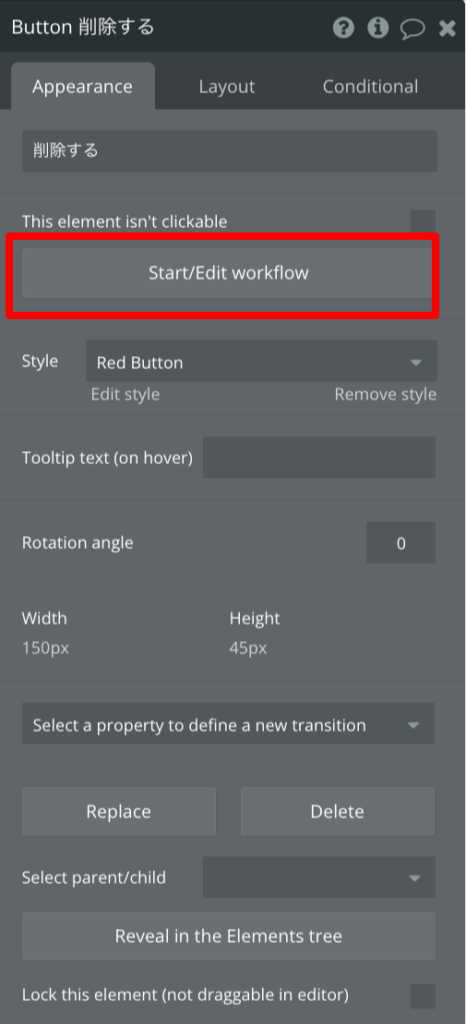
Data(Things)からdeleteを選択します。
idは更新の際に作成したエレメントで問題ありません。
Step2に、Refresh the pageを選択します。
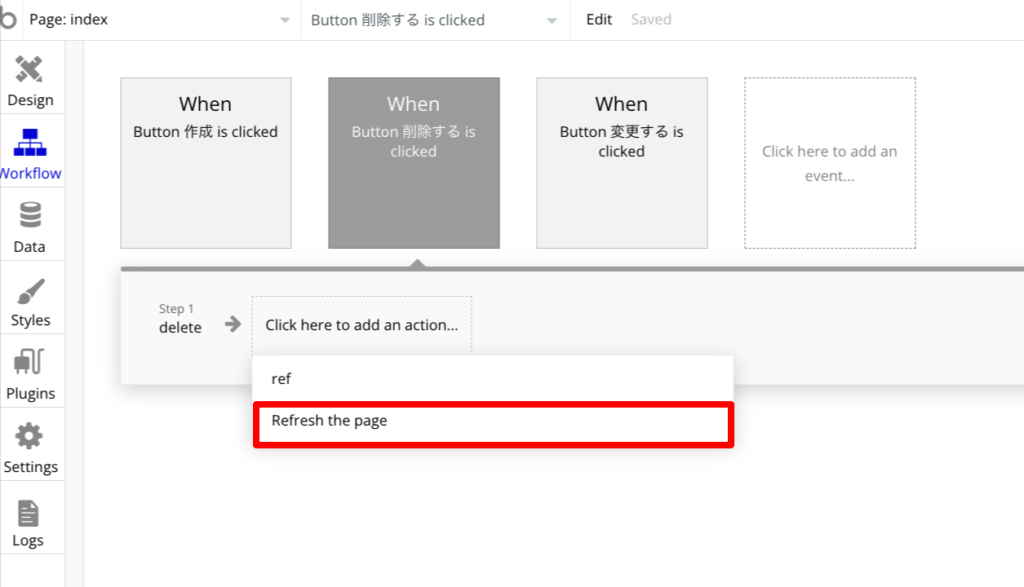
プレビューを開き、削除ボタンを押してデータが消えればOKです。
まとめ
今回はSQL Database Connectorというプラグインを使って、外部データベースと接続し、データ操作の実装しました。
本記事で紹介した操作以外でも複数データベースの操作や表示などもできそうなので、機会があったら紹介したいですね。
今後の可能性としては、前頭でも話した通り、プログラミング言語で作られたWebサイトでデータ操作する際に、Bubbleですと簡単にデータを扱うことができそうだと思いました。
以上で終わりたいと思います。ありがとうございました。
メンバーを募集中!
当社ではお客様に向き合い、お客様の事業成功にコミットをできる仲間を募集しています。
正社員、インターンから副業まで、幅広く採用活動を進めております。プロジェクトマネージャーやシステムエンジニアとして当社のシステム開発業務に携わってみませんか?
当社と共に、業界トップを目指して挑戦したい方は未経験者から経験者まで広く募集しているので、ぜひエントリーをお待ちしています。