
こんにちは。ファンリピートの鳴海です。
今回はBubbleでシステムを運用している際に、リストを特定の時間にSlack通知させる実装について、説明していきたいと思います。
またBubbleやSlack APIについての開発や実際に画面を作成していますので、よければご覧ください。
Bubbleとは?

URL:https://bubble.io/blog/content/images/2020/09/Logo-with-clearspace.png
Bubble.ioはプログラミング知識があってもなくても、Webアプリが簡単に制作できるサービスとなっており、
誰でも使えるようなサービスとなっております概要としては下記の通りとなっています。
- ノーコードツールの一つである
- レスポンシブに対応している
- 拡張性が高い
ノーコードツールの一つである
ドラッグ&ドロップという操作で、Webアプリが制作できます
またアプリをインストールする必要がなく、
クラウドプラットフォームというサイト上でアプリケーションを構築できるので、
インターネットがあればいつでもどこでもアクセスができるため、チームで連携してアプリを作れます
レスポンシブに対応している
画面サイズに合わせて、自動調整してくれる機能があります
BubbleではCSS Flexboxと呼ばれるページ要素のレイアウト方法により、
要素自体に0~100%、px単位で設定ができるため、細かいデザインの設計が可能となっています。
拡張性が高い
プラグインでは、UI、機能など様々なプラグインをインストールできます。
マップ機能や検索機能などデフォルトでも様々なシステムが搭載されていますが、
プラグインでは画像をスライドショーでの表示、ヘッダーをハンバーガーメニューなどといった機能があります。
今回はSlackで通知するためのAPI connectorというプラグインを活用して、具体的にどのように活用していくか説明していきます。
Slack Web APIの設定
APIを使うことにより、外部からの処理や通知などの自動化ができるものとなります。
Slack Web APIとは?
予定があったタスクや予約の申し込みなどSlackに通知させたい内容を自動送信してくれるようなBotという
設定するためのツールとなっており、下記の通りで可能です。
今回はメッセージの送信の設定方法について説明します。
- メッセージの送信や削除
- チャンネルの作成や削除、編集
- ユーザー情報の取得
- チャンネルメンバーの追加や削除
- ファイルのアップロードやダウンロード
アプリケーションの作成
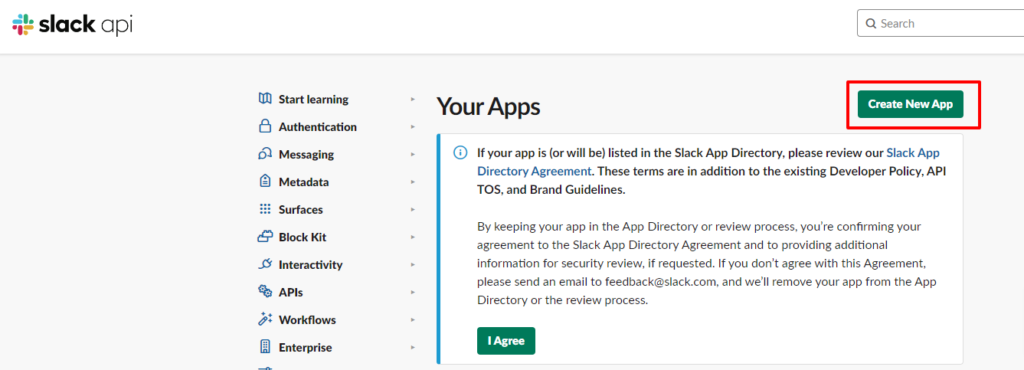
初めにSlack APIを通知する準備するために下記のサイトで登録します。
Creat new APPを押下します。
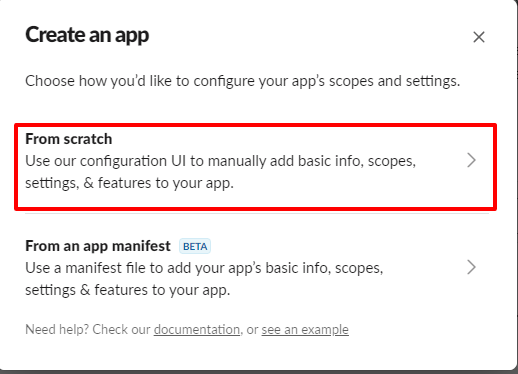
From scratchを押下します。
選択することによって、どのワークスペースかどの範囲かという設定ができます。
次に名前を決めて、どのワークスペースか指定し、Create Appを押します。
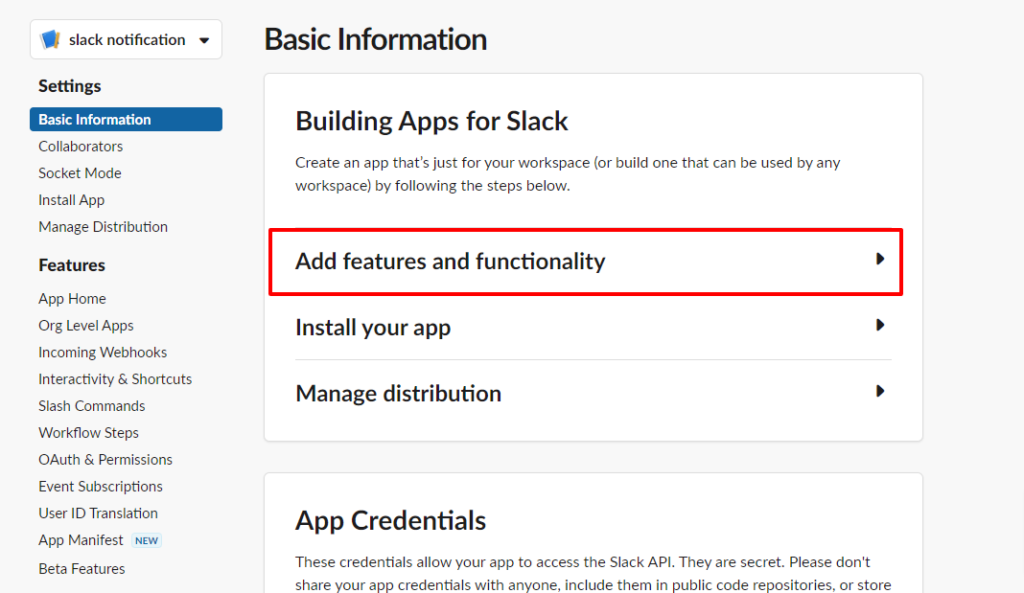
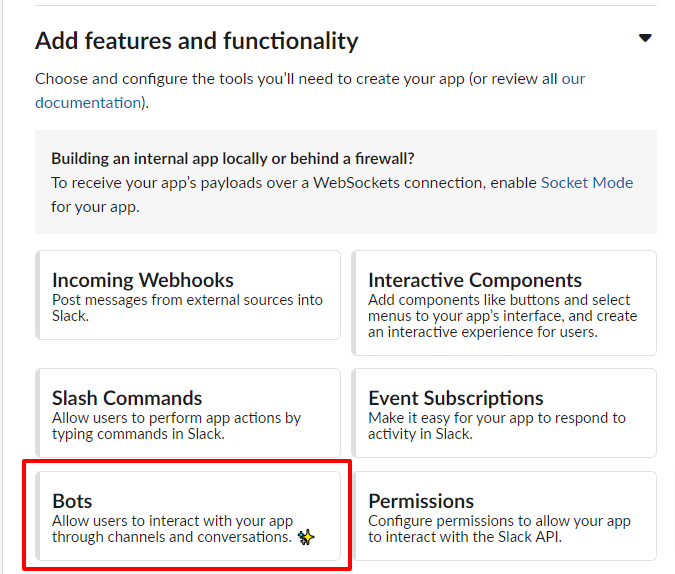
Botを使いたいので、Add features and functionalityを押します。
Botsを押します。
Botの名前やTokenを発行して、Botsを作成していきます。
次にBotに権限を与えてあげたいので、calls:readを選択します。
権限についてSlackでドキュメントを公開しているので、詳しくみたい方は下記を参照してください。
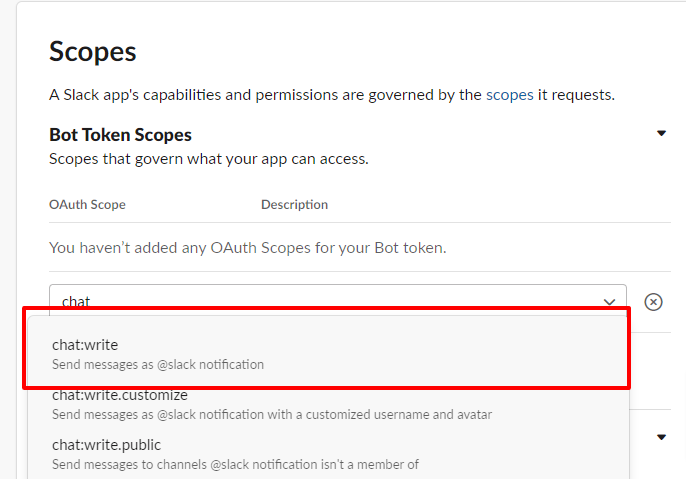
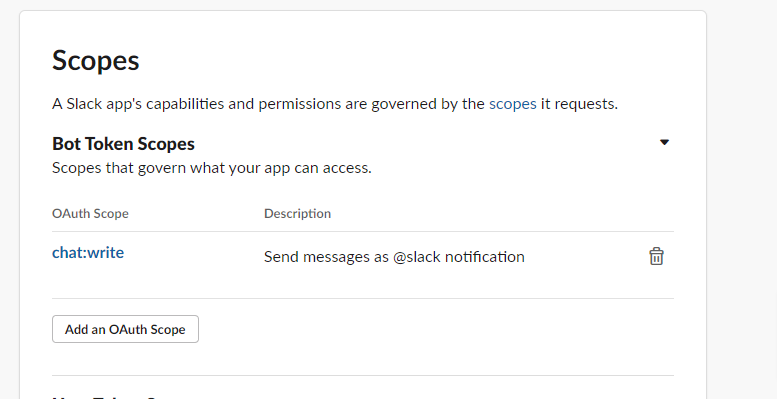
追加するとSuccess!とでるので、これでScopeの設定はOKです。
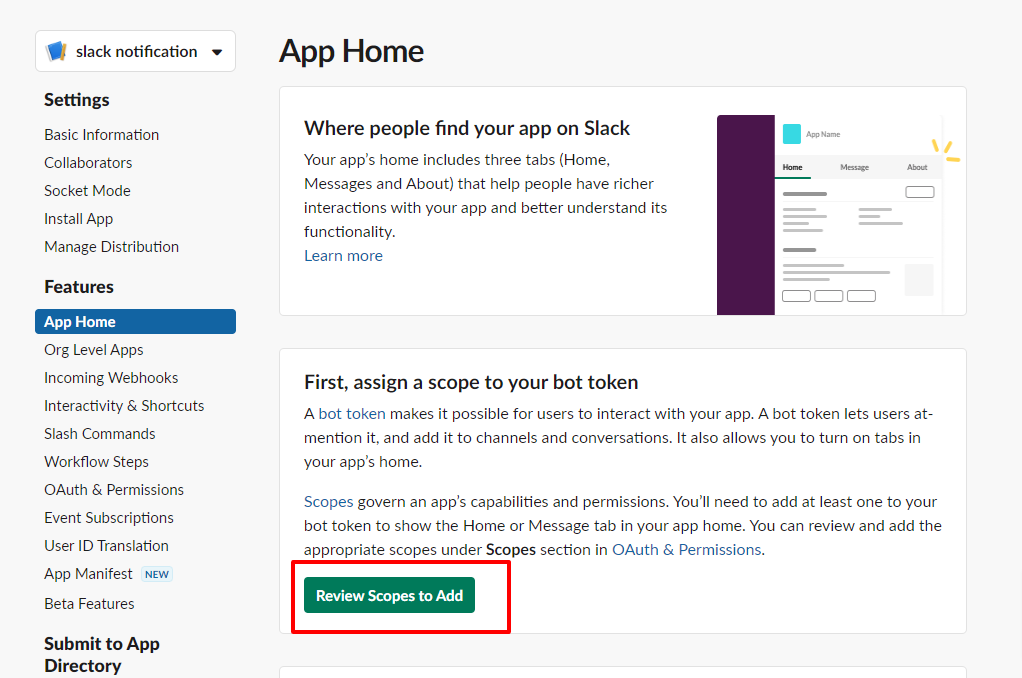
次にBotに名前を付けたいので、App Homeを押して、Home画面に戻ります。

そうすると、Your App’s Presence in SlackというSlackの環境設定が表示されるので、Editを押します。
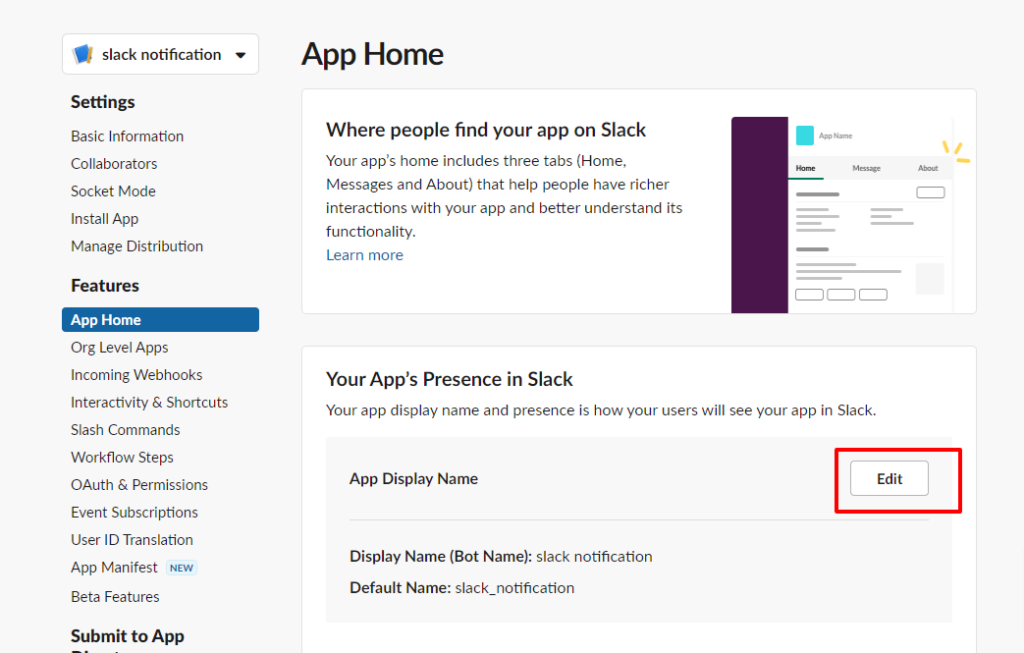
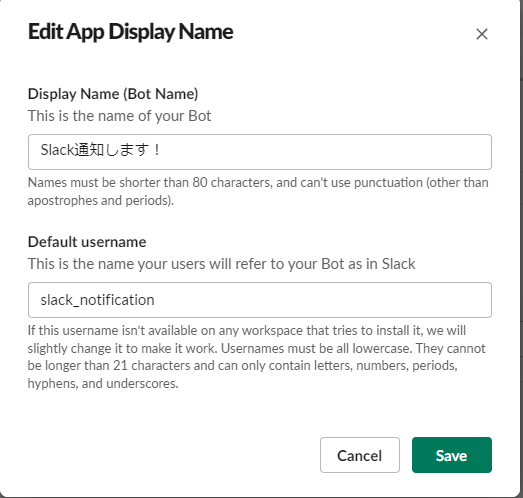
ここで通知された時に、名前が表示されるので、わかりやすい名前で設定しましょう。
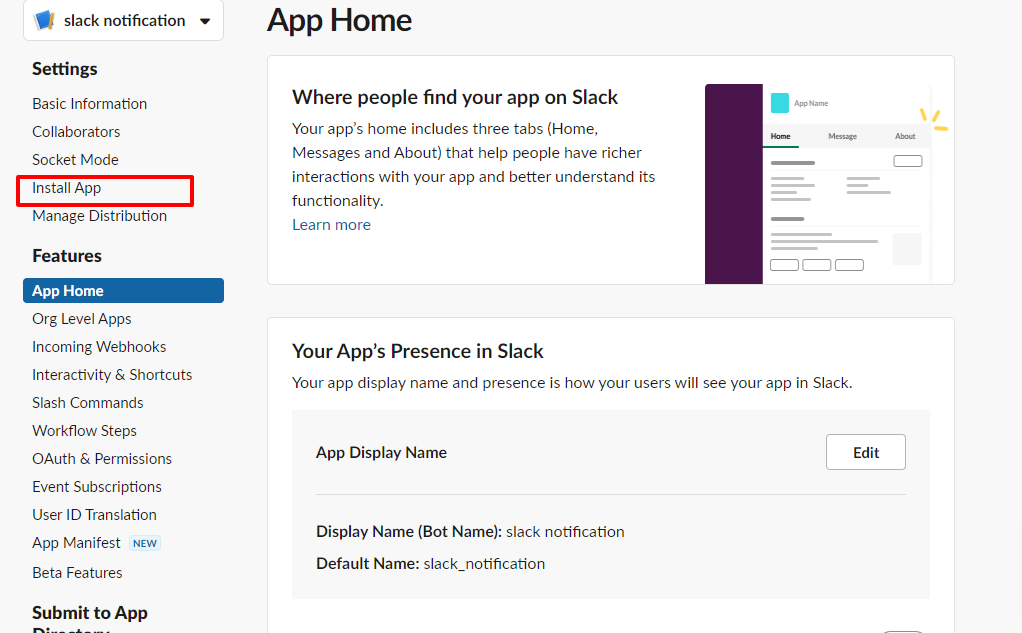
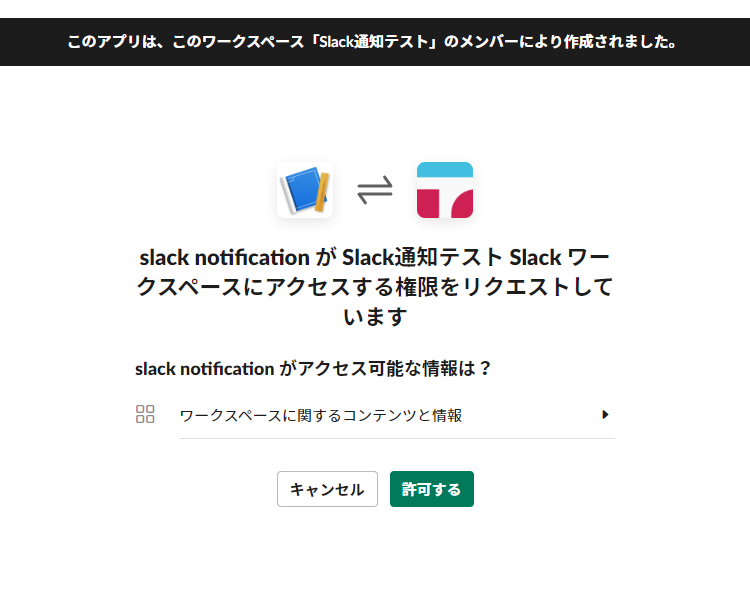
次にワークスペースに設定したBotをインストールしたいので、Install Appを押下します。
Install to appを押します。
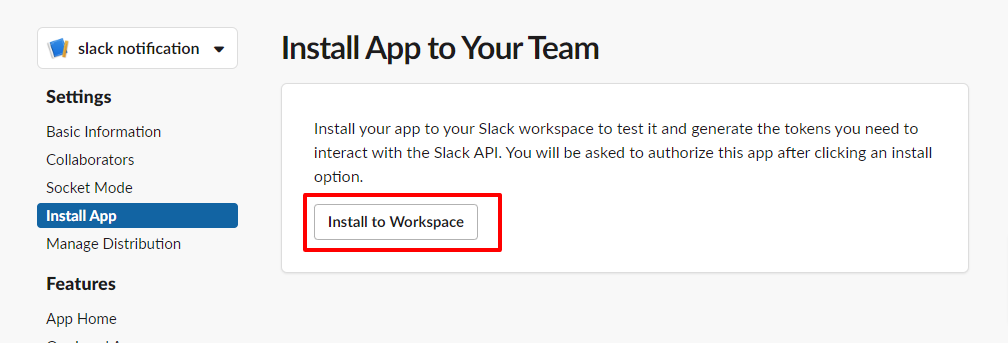
そうすると、許可しますかと求められますので、ここで指定したワークスペースか問題なければ、許可するを押します。
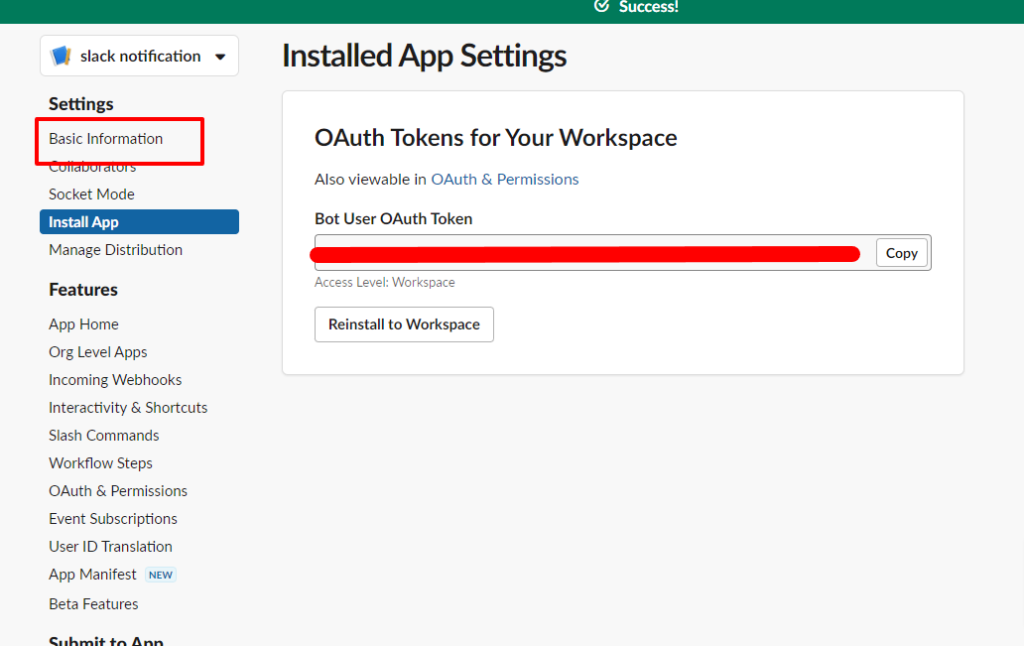
そうすると、Tokenが発行されますので、誰にも漏れないようにメモしておきます。
このTokenを知られてしまうと、悪用されて、意図しない通知がされてしまう可能性があるので、気を付けましょう。

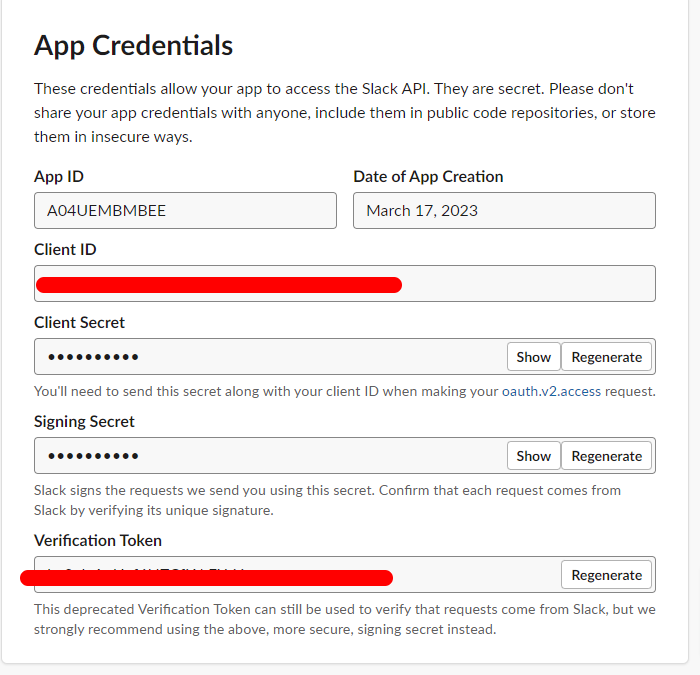
Tokenの次はClient idとCliend secretというBotに通知するときの認証情報が必要となりますので、
Basic Informationを押下します。
そうすると表示されるので、こちらもTokenと同様に漏れないようにメモしておきます。
Botを招待
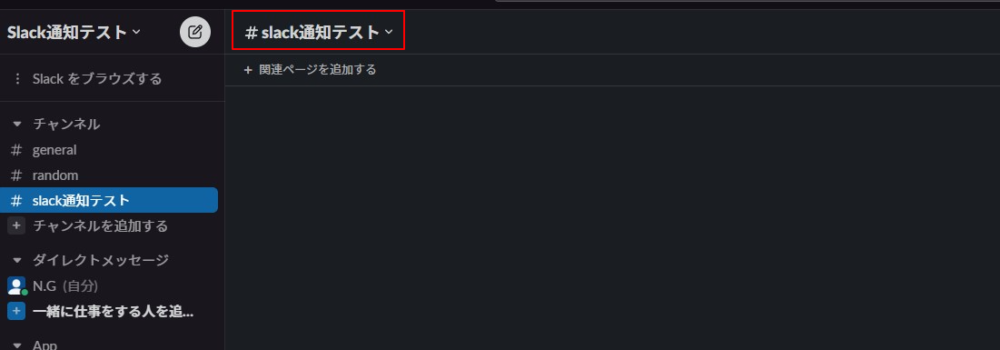
次に作成したボットをワークスペースから招待してあげます。招待したチャンネルを開き、チャンネル名をクリックします。
インテグレーションに移動すると、Appというのがあるので、アプリを追加するを押下します。
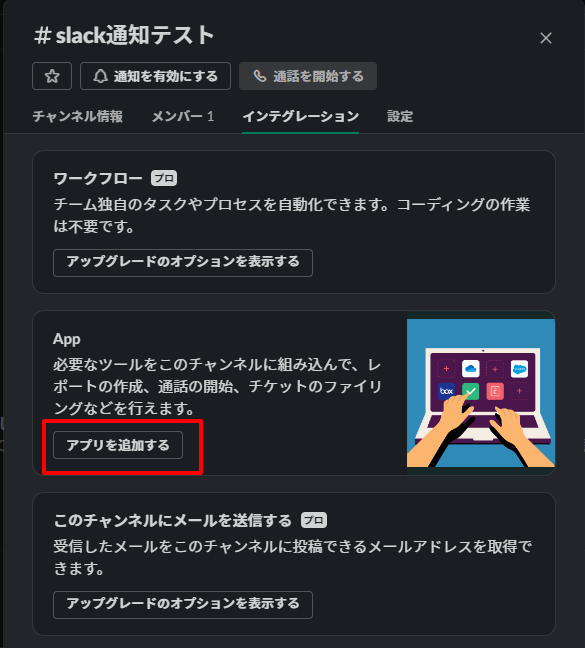
次にどのAppを追加するか問われますので、作成したBotで追加します。
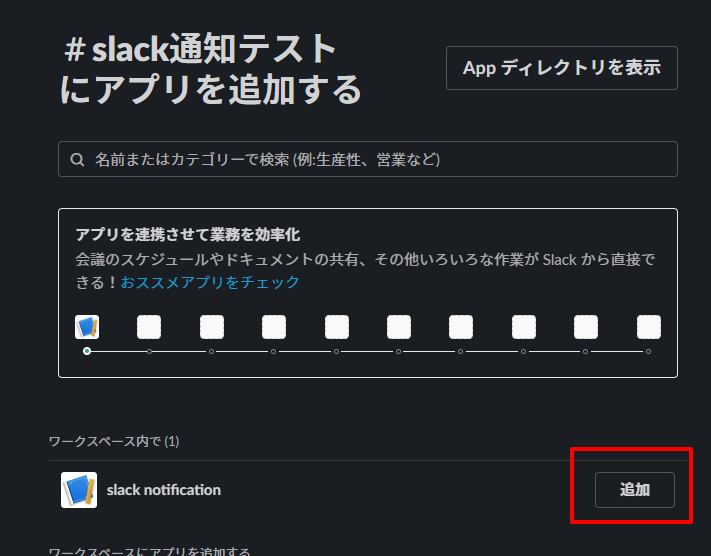
無事にできたら、これでワークスペースにBotが追加されました。
Bubbleでの手順
ワークスペースにBotを追加ができたので、次は通知させるためにBubbleで設定します。
アプリを作成する
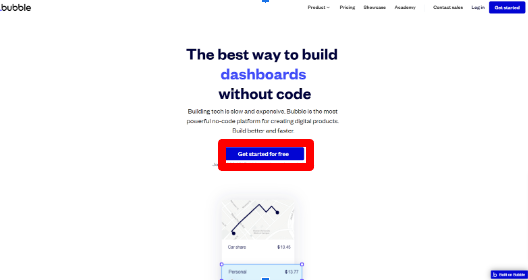
初めにこちらのページにアクセスして、Get started for freeからアカウントを作成しましょう。https://bubble.io/
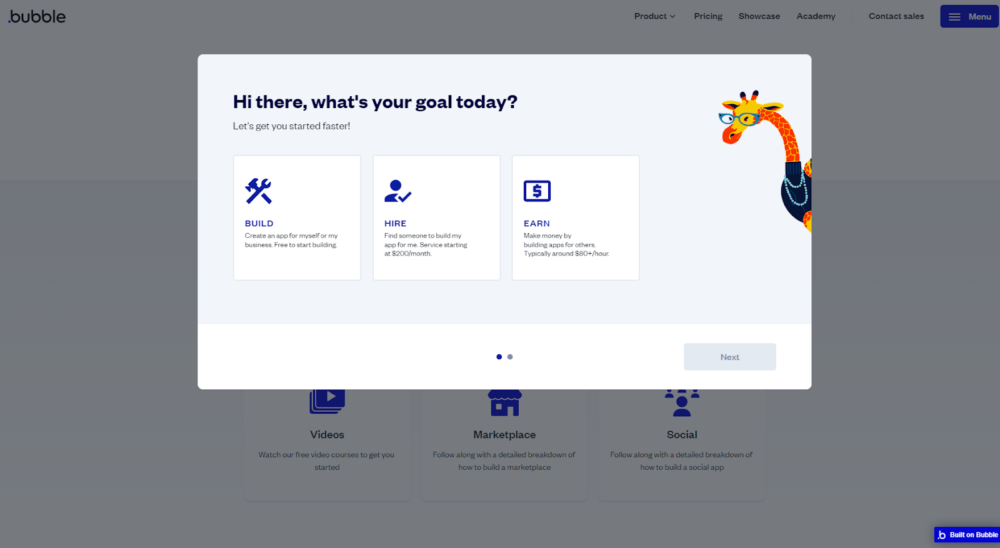
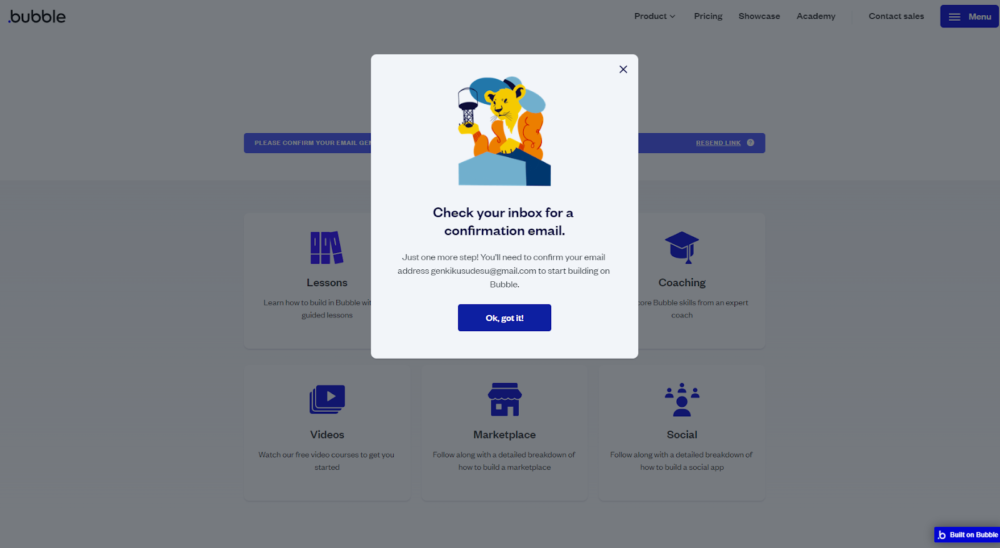
メールアドレスやパスワードを打ち込み、Start buidlingをクリックすると画像のようなポップアップが表示されるので、Build→Nextボタン→other→Completeと進めてください。
そうすると登録したメールアドレスにメールが届くので、そちらをクリックしてあげてください。
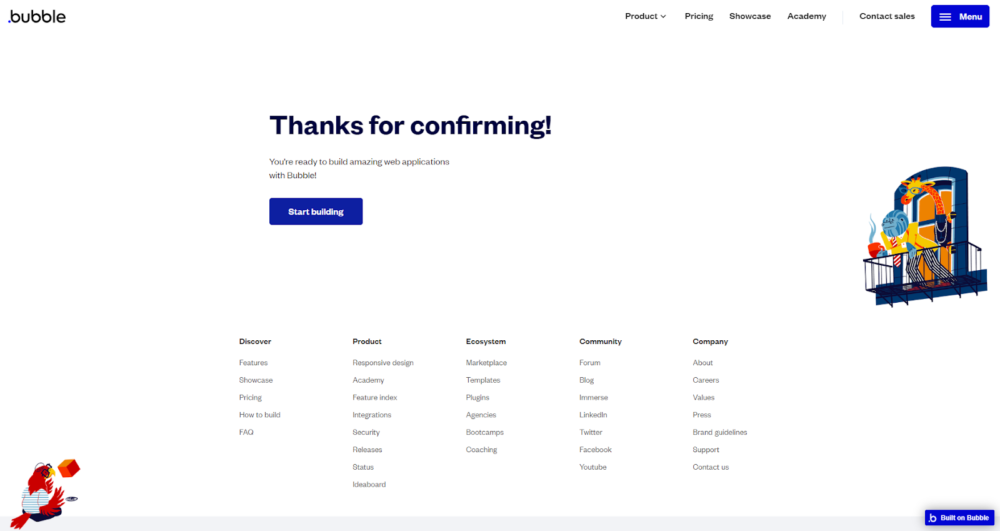
リンクをクリックすると、Start buildingのボタンがあるので、クリックしてください。
トップページのCreate a new appをクリックし、Name your appで名前を決めて、他の項目を入力し、Create appをクリックすると編集画面に飛びます。
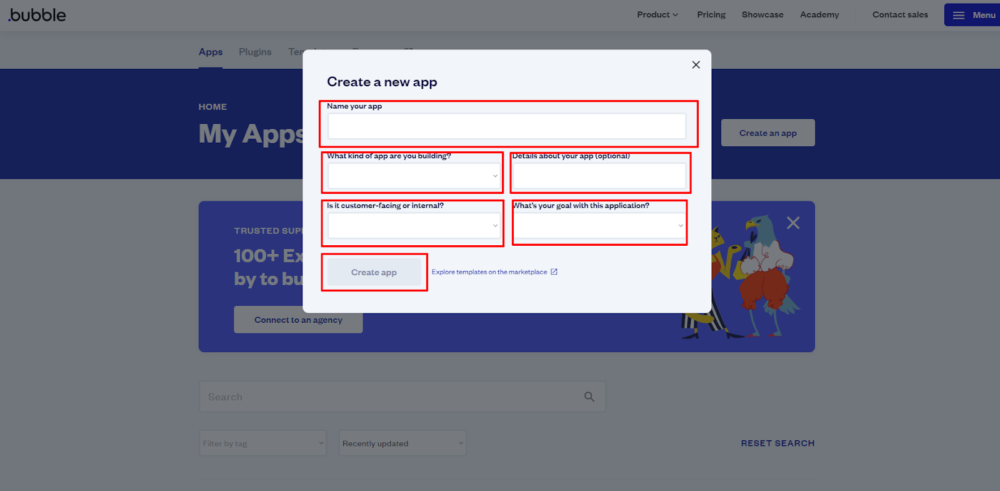
アシスタントというのが左側に表示されるので、Skip application assistantをクリックしてください。これでアプリの登録が完了です。

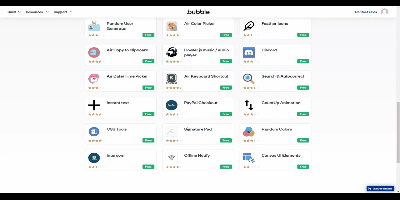
必要なプラグインをインストールする
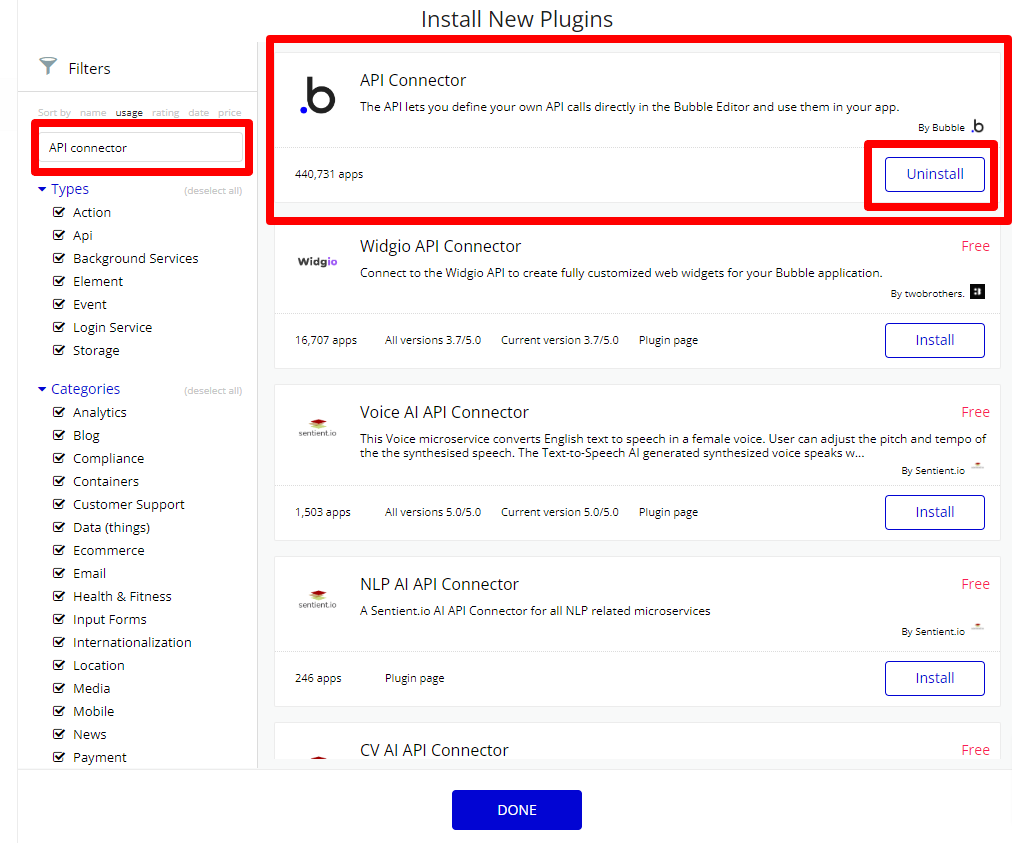
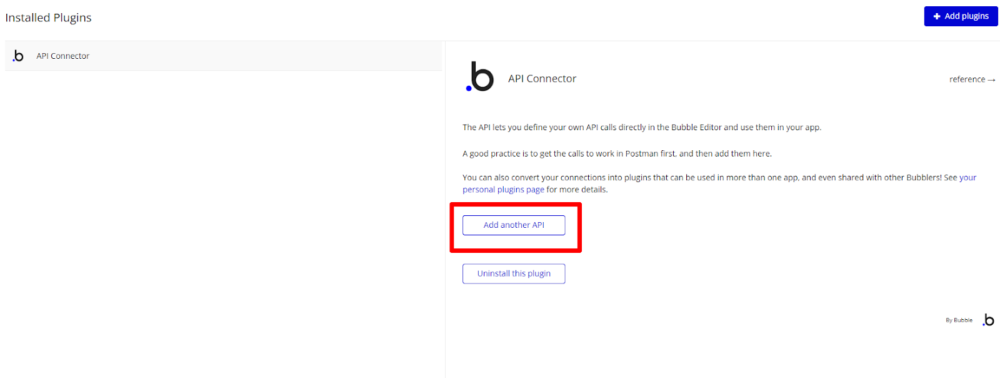
APIでSlack通知させるために、今回はAPI connectorというのを使います。
Search for a plugins…で、API connectorと検索し、installをクリックする。
Slack APIが使えるように設定する
Add another APIを押下します。
どのAPIかわかりやすいように名前を付けてあげて、expandを押して、そちらにも名前を付けてあげます。
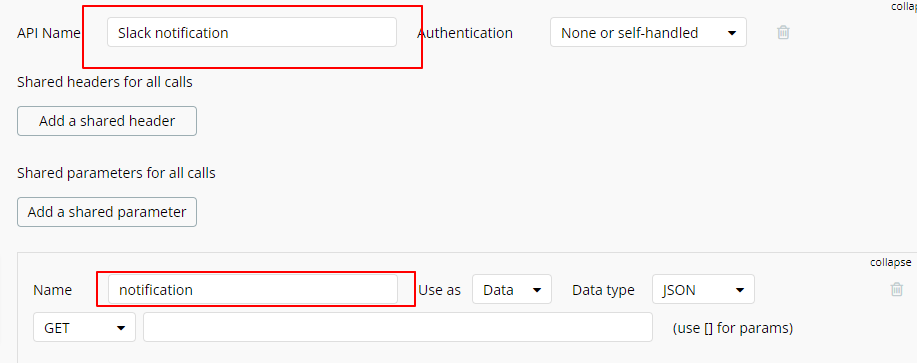
次に下記の通りで設定します。

Use as Action
Actionに変更することで、Workflow上で使えます。
POST
他にも取得する際のGETや削除や作成などがありますが、今回は送信したいので、POSTを選択します。
https://slack.com/api/chat.postMessage
Slack Web APIの1つで、指定したチャンネルにメッセージを投稿するためのURLとなります。これで送る処理ができます。
他にも色々なSlack Web APIがあるので、みてみてください。
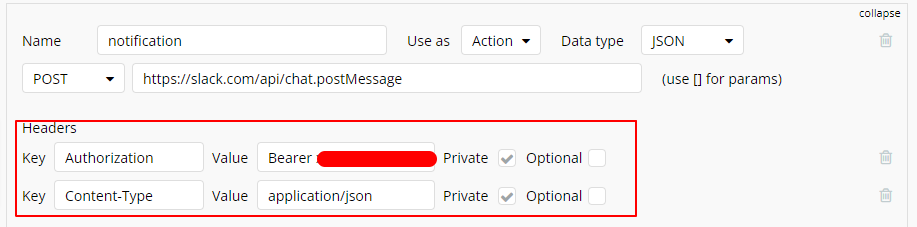
次に処理を送る際に認証情報を設定してあげます。こちらを設定してあげないと認証情報がありませんとはじかれますので、下記の通りで設定します。
Headersに追加する。
Authorization
Keyに「Authorization」
valueに「Bearer slackで設定した時のトークン」
Bearer認証となりますので、このような入力となります。
Content-type
Keyに「Content-type」
Valueに「application/json」
Content-typeはHTTPヘッダーの一種で、送信されるコンテンツの種類を示すために使用されます。
application/jsonは、送信するデータがJSON形式であることを示します。
JSONは、Web APIでよく使用されるデータ形式の一つであり、JavaScriptオブジェクトと似た構文を持っています。
HTTPリクエストのボディにJSON形式のデータを含める場合、Content-typeをapplication/jsonに設定して、JSON形式であることを示す必要があります。

Body type JSON
JSON形式で、送り先のチャンネルIDと送る文章などを設定ができます。
Body
{

    "channel": "<channel_id>",

    "text":  "<text>",

}
Keyに「text」、Valueに「こんにちは」
送信できるように「こんにちは」としています。
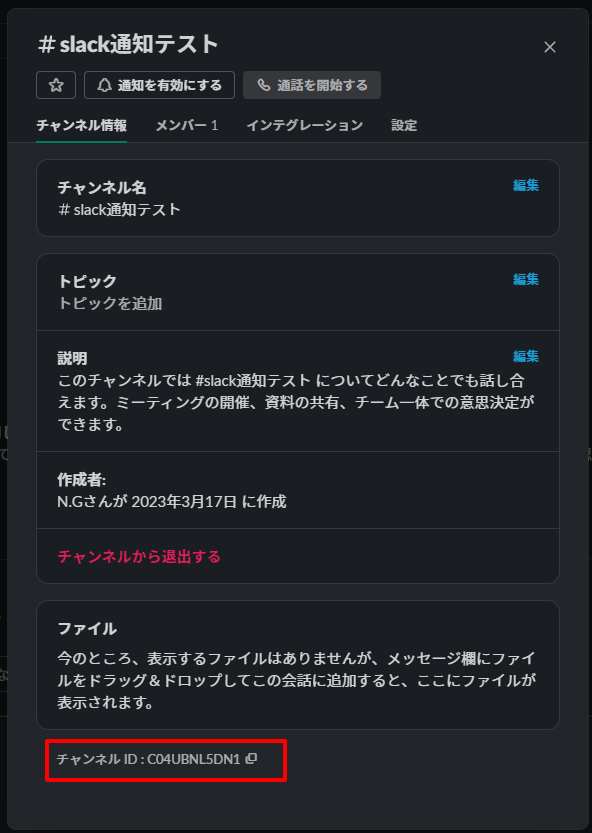
channel_id、Valueに「チャンネルID」
チャンネルにAppを追加した時のような手順で、チャンネル設定を開き、IDをコピーします。
入力が終わったら、Initialize callを押してテストします。
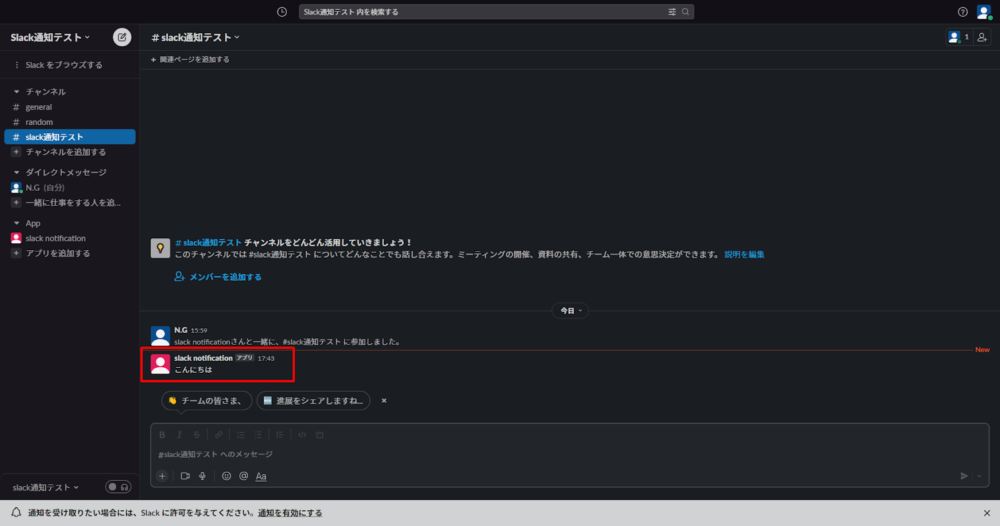
Bubbleの方ではtrueと来ていれば成功です。
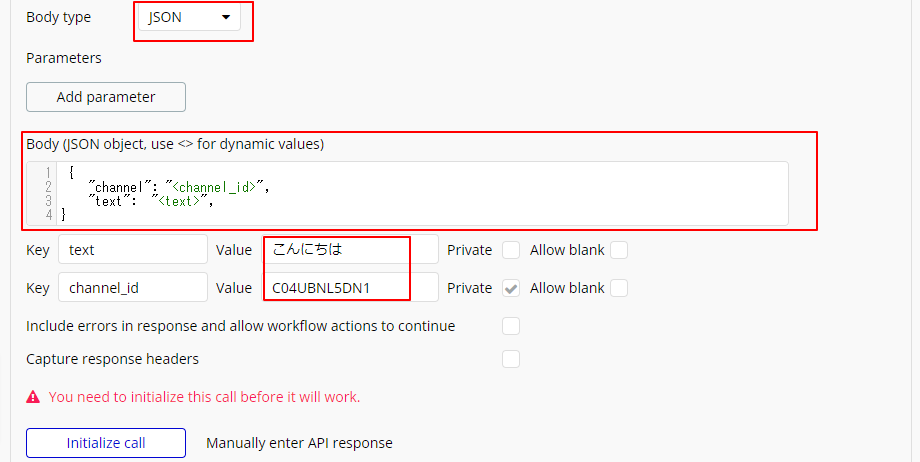
Slackの方にも通知が来ています。
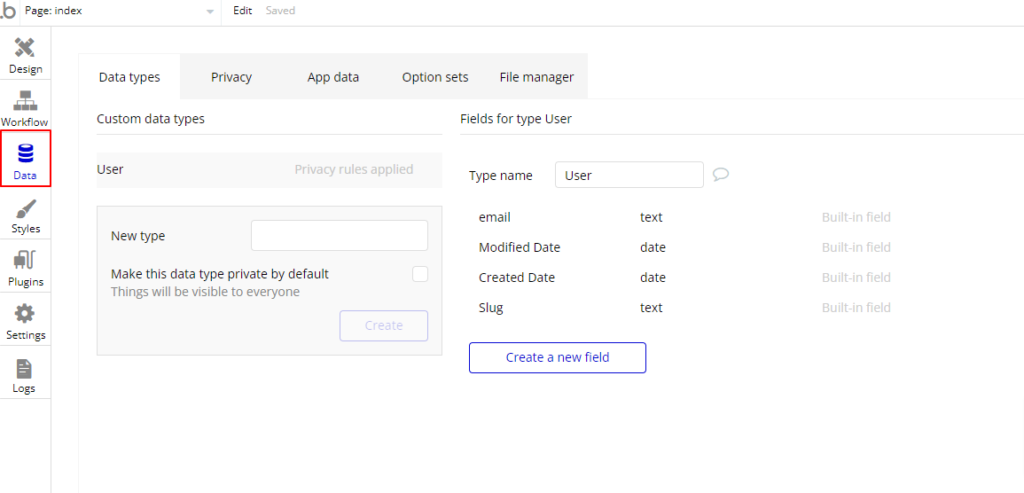
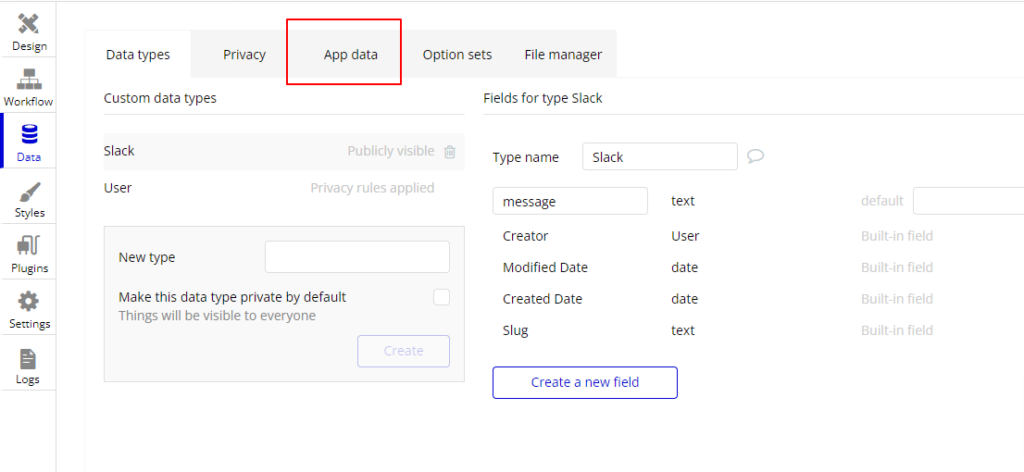
データ型を設定する
BubbleのDataタブからテーブルを追加して、テキスト型のカラムを追加し、いくつかデータを入れておこうと思います。
Dataタブを開きます。
Slackという名前で作成します。
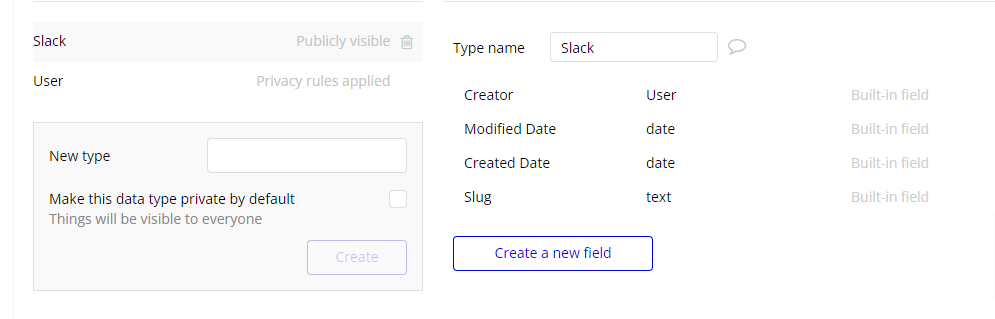
次にCreate a new fieldでカラムを追加します。
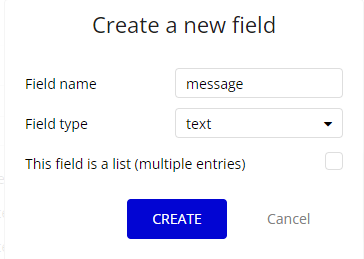
入力が終わったら、CREATEボタンを押下します。そうすると、messageが追加されているのが確認できます。
次にデータを入れます。
App dataを押します。
New entryからいくつかデータを追加します。

今回は「通知1」という形で、5つほど作成します。

下記のように追加していれば、OKです。

画面を作成する
追加したデータを一覧に表示させ、ボタンを押すと即日通知と特定の時間で毎日通知させる方法を説明します。
データを表示する
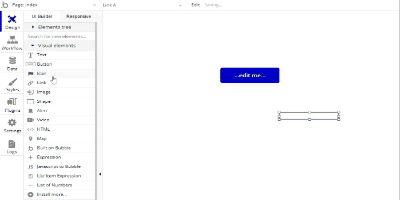
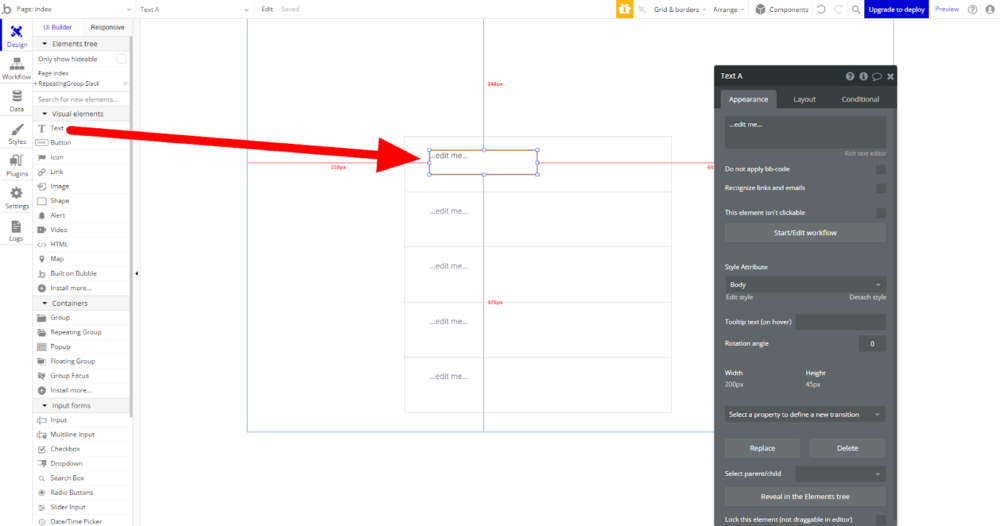
Designタブで、Repeating groupをドロップします。
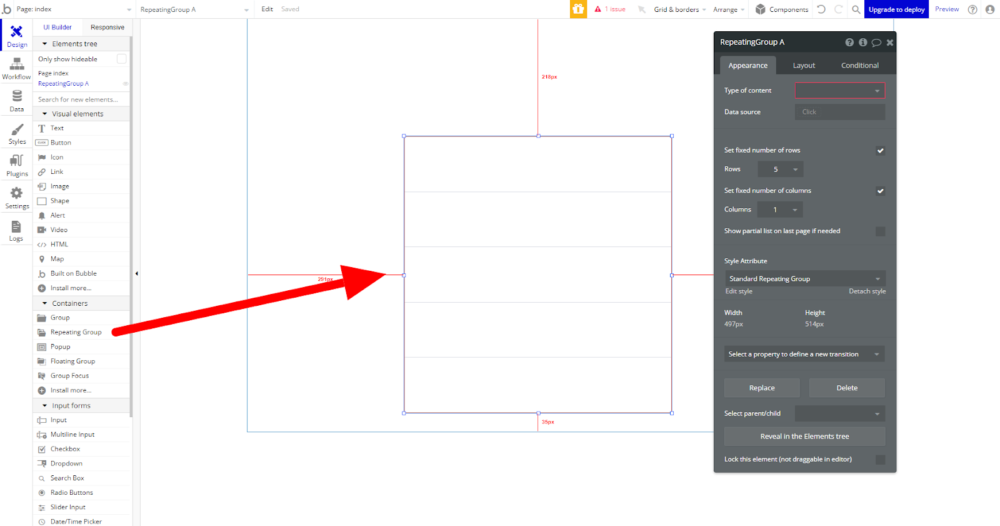
データのセット
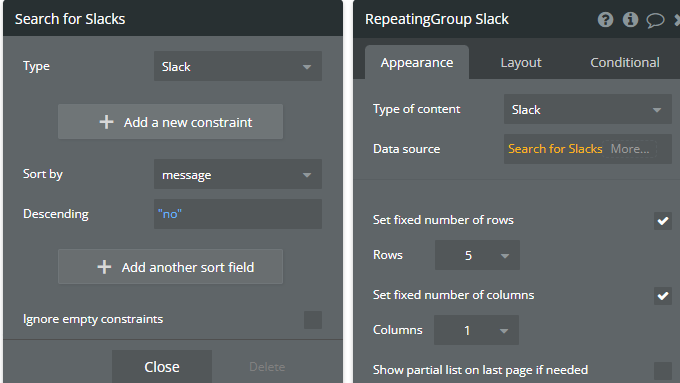
Type of contentでslackを選択します。
Data sourceに加え、Do a search forで取得します。
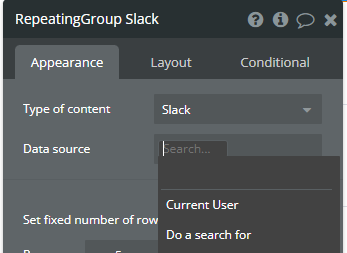
Typeをslackにし、messageを降順で表示させます。
次にテキストを表示させたいので、Textエレメントをドロップします。
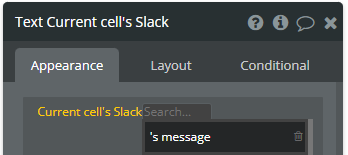
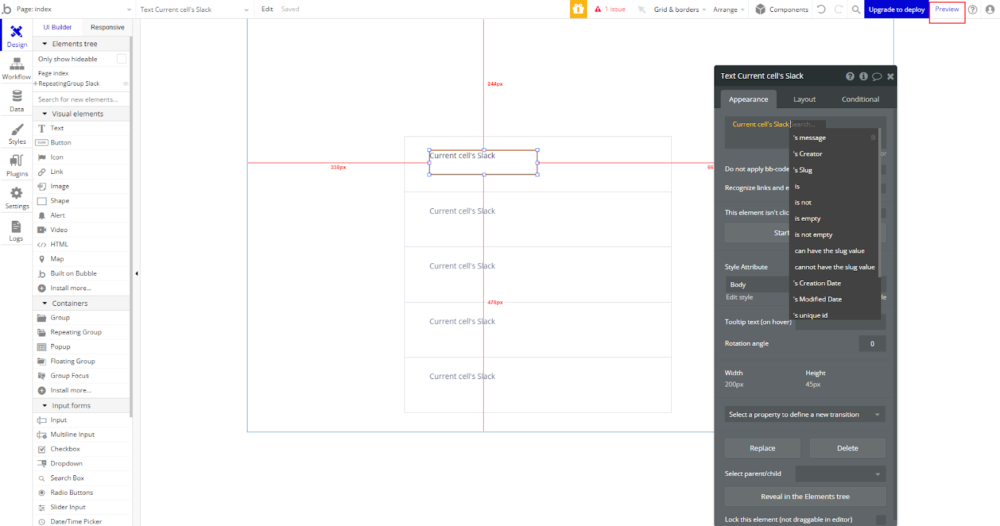
…edit me…をクリックして、Current cell’s Slack’s messageを選択します。
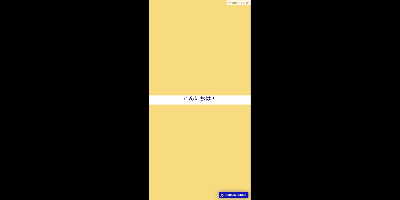
これでひとまずプレビューしてみます。
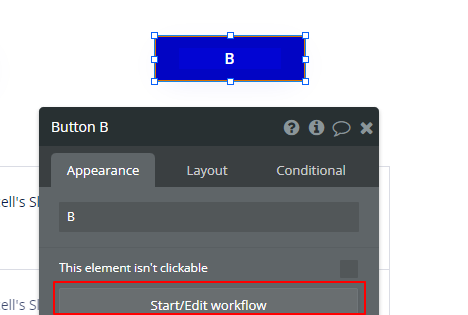
ボタンを追加
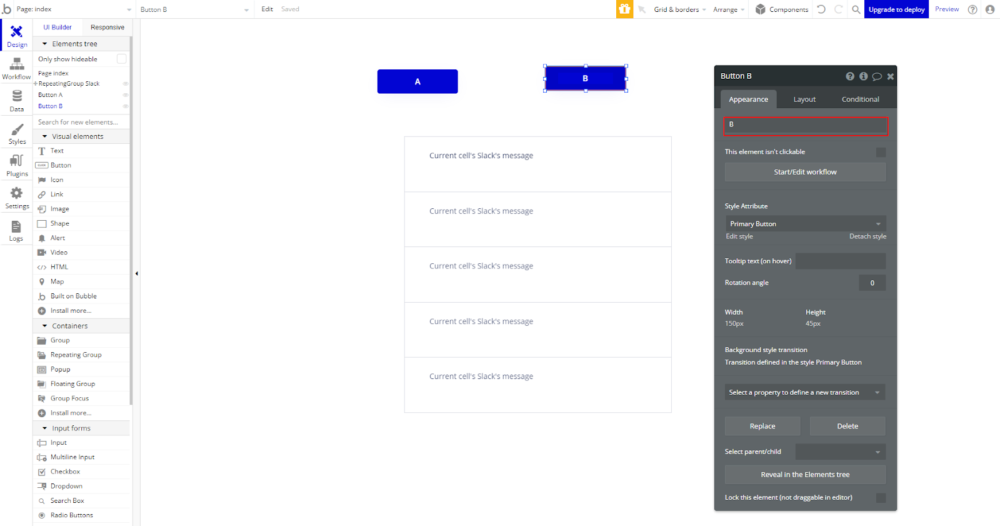
2つボタンを追加します。
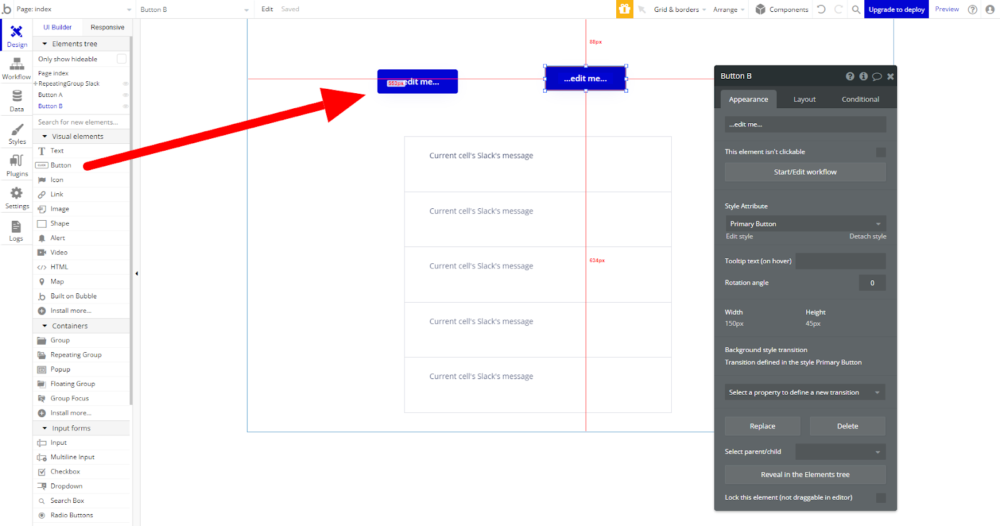
名前をA、Bで付けておきます。
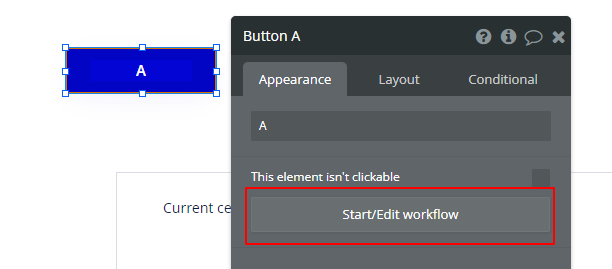
即時通知
Aのボタンを押下したら、通知できるようにしたいので、Aのボタンを選択し、Start/Edit workflowを押します。
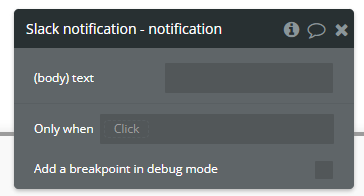
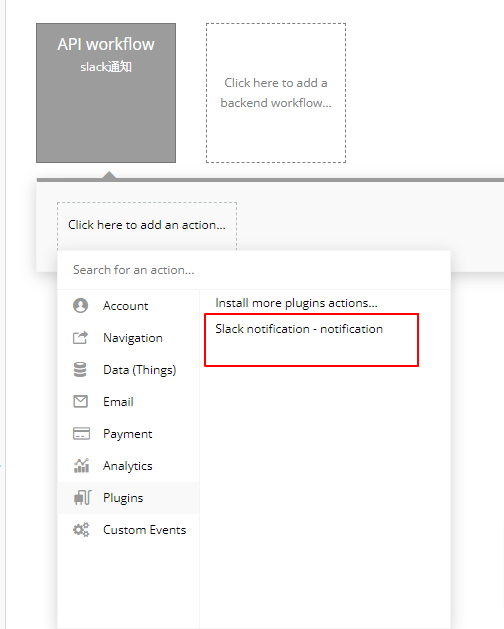
そうすると自動的にWorkflowのタブに移りますので、PluginからSlack notification – noticationを選択します。
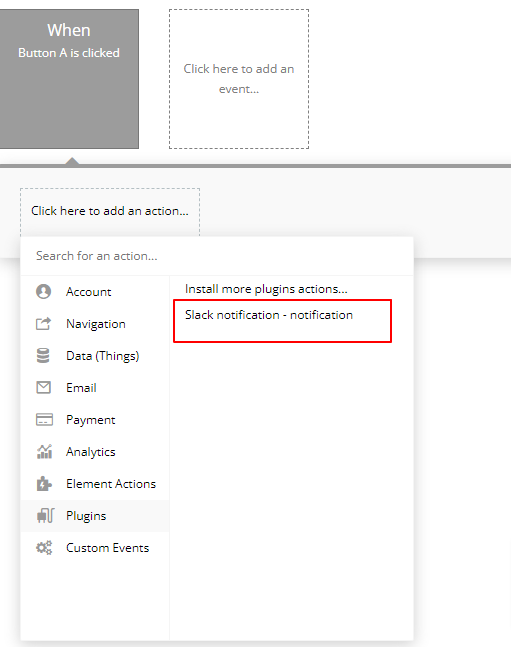
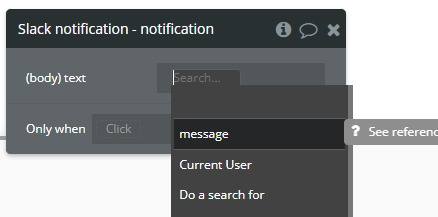
(body).textで通知する内容をセットできます。
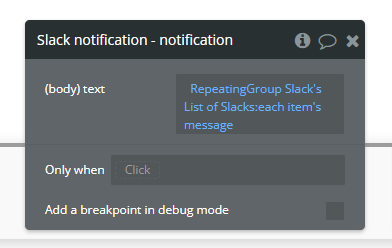
ここではRepeating groupにセットしているデータを送信したいので、
RepeatingGroup Slack’s List of Slack:each item’s messageを選択します。
毎日セットする方法については、Backendの設定が必要となりますので、次のセクションで説明します。
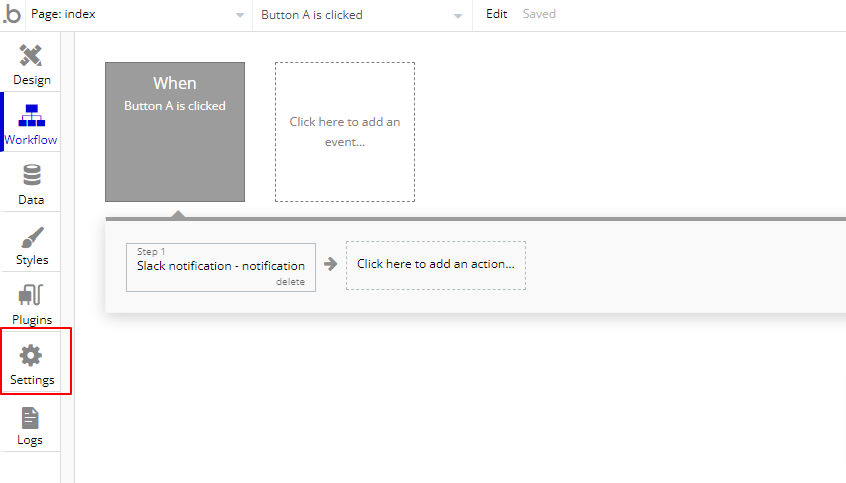
Backendを設定する
Backendでは基本的にAPIでの処理を設定するときに、使われるページで、デフォルトでは表示されていません。
なので、SettingからBackend workflowを使えるようにします。
設定方法
Settingタブを開きます。
APIを押します。
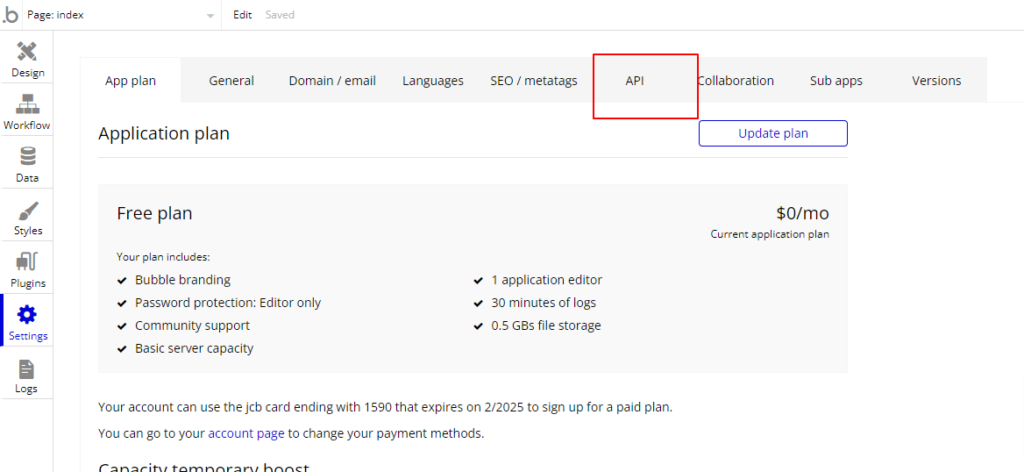
Enable Workflow API and backend workflowsをチェックします。
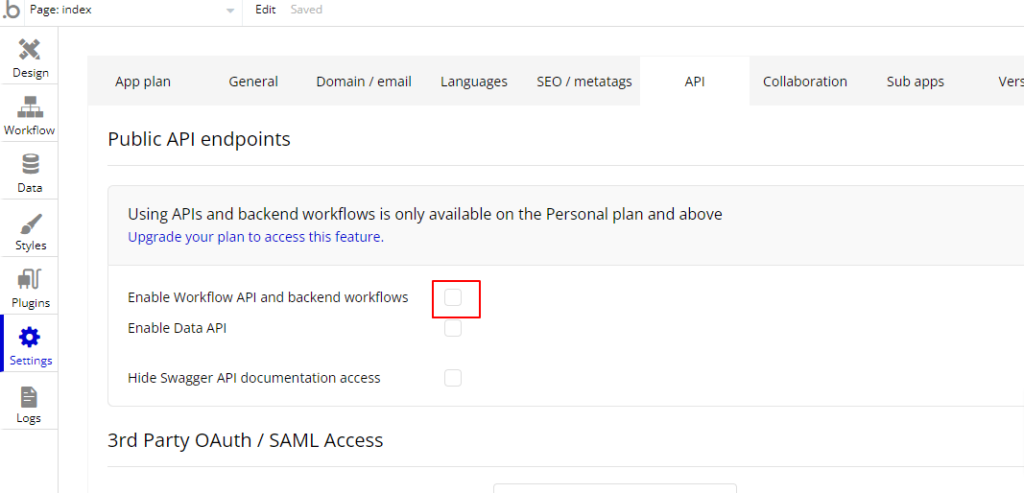
ページをクリックすると、Backend workflowが表示されるので、そちらを押します。
Backendの設定
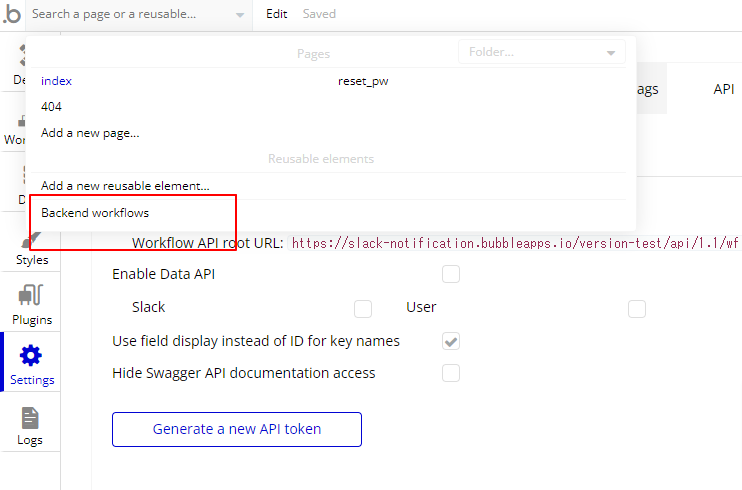
New API workflowを押します。
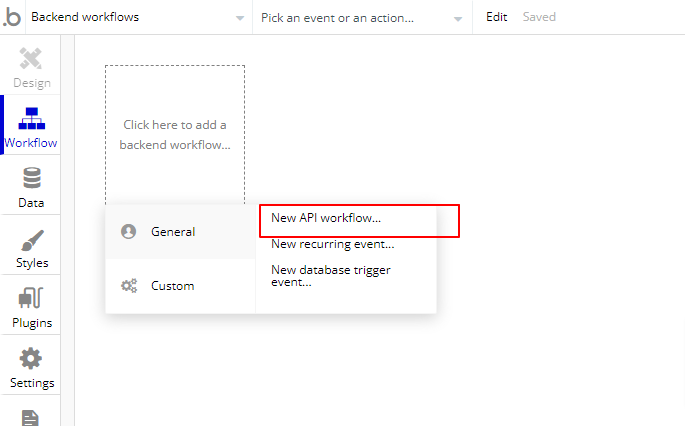
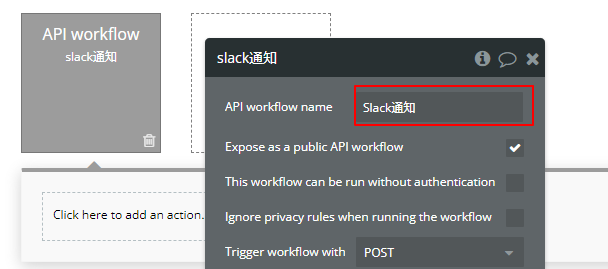
APIの名前をつけます。
Parameterにテキストを受け取るようにします。
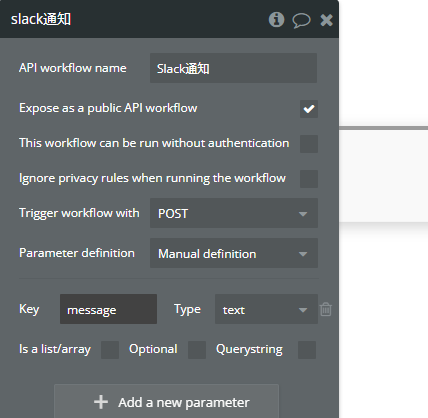
Designタブで行った設定と同じく、Slack Notificationを選択します。
(body).textで先ほどパラメータで設定したmessageが表示されますので、そちらをセットします。
次にRecurringというAPI処理で、毎日繰り返すような処理を追加します。
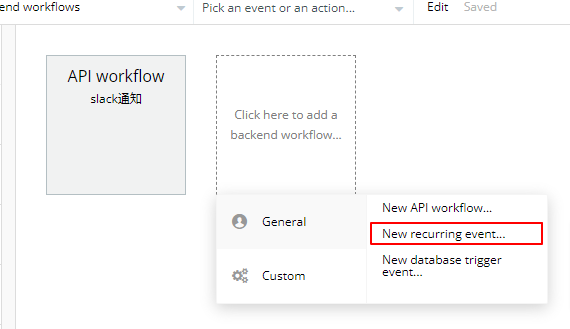
Event nameとType of thingをセットします。
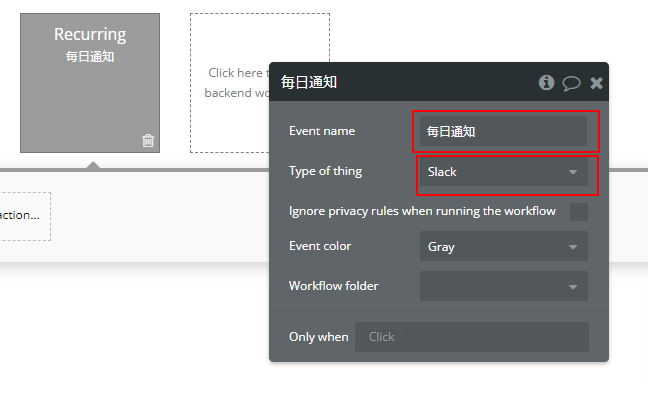
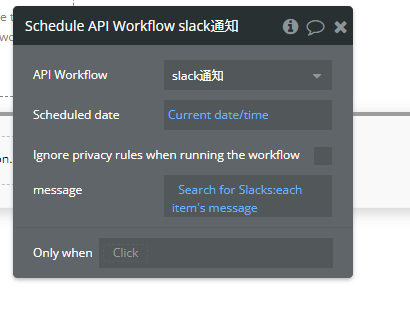
次に先ほどSlack通知のAPI workflowを作成したので、そちらを処理に追加します。
API workflowをslack通知で選択し、Scheduled timeをCurrent date/time、messageにはDo a search forでSlackでのリストを取得し、それぞれmeesageのカラムを出力するようにします。
毎日送られるようにセット
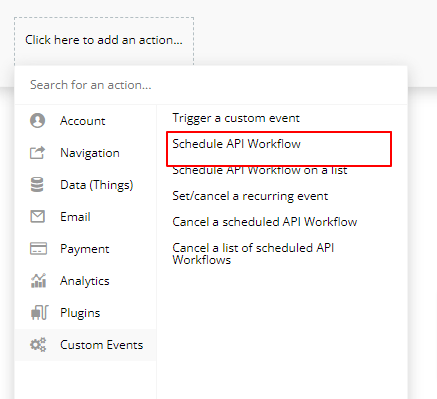
DesignタブでBのボタンを押下した時の設定します。
繰り返すためにrecurring eventを選択します。
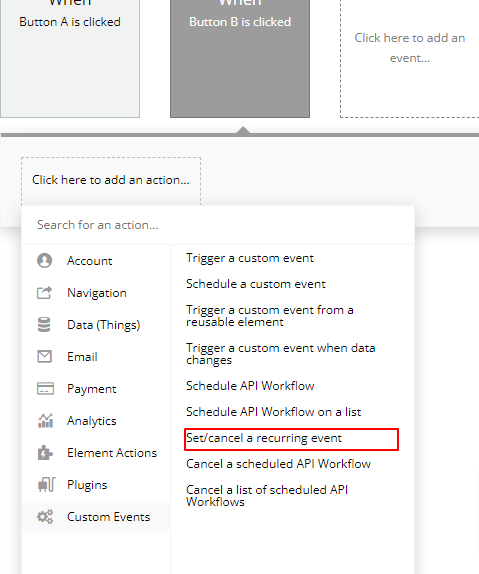
API folder
繰り返し通知するAPIフォルダを選択
Workflow thing
Workflow thingにはDo a search forでSlackのテーブルを選択し、
first itemにします。実際に処理が行われる際にはBackendで設定したリストが通知されます。
Frequency
下記のような間隔で選択できます。今回は毎日通知させたいので、Dailyを選択します。
- Daily(毎日)
- Weekly(一週間ごと)
- Monthly(1か月ごと)
- Quarterly(4半期ごと)
- Yearly(1年ごと)
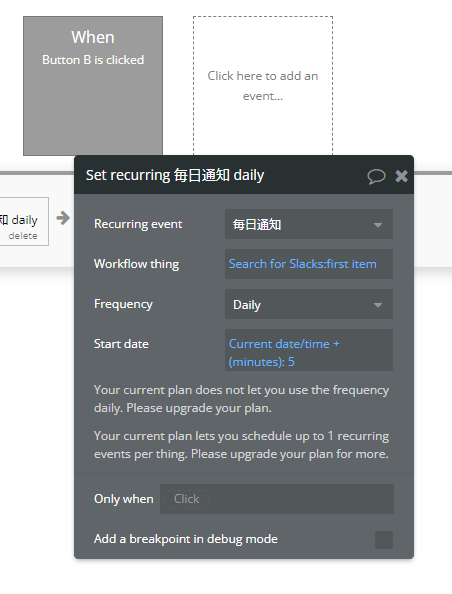
これで設定は完了です。
検証
Aのボタンを押下してみます。Slackで通知されていました。

Bのボタンを押下してみて、Logsでセットしてあるか確認します。

通知されるまで待ってみて。しっかりと来てました。

通知後もセットしてあるか、Logsでみると、しっかり次の日にセットされていました。

まとめ
リストを特定の時間にSlack通知させる実装について、説明しました。
BubbleではBackendで細かくAPIの設定ができるので、バッチ処理などもできて、便利ですね。
今後も何か他に活用できそうなことがあれば、紹介していきます。
メンバーを募集中!
当社ではお客様に向き合い、お客様の事業成功にコミットをできる仲間を募集しています。
正社員、インターンから副業まで、幅広く採用活動を進めております。プロジェクトマネージャーやシステムエンジニアとして当社のシステム開発業務に携わってみませんか?
当社と共に、業界トップを目指して挑戦したい方は未経験者から経験者まで広く募集しているので、ぜひエントリーをお待ちしています。


